
How to capture and store a user’s response?
This article provides a complete guide on capturing user responses, such as name, email, and more, and shows how to store and utilize them in your chatbot to create personalized and engaging experiences.
To create smooth, natural interactions, chatbots need to capture information just as humans would in a conversation. That’s where the Capture Step comes in.
With the Capture Node, you can collect specific details from users—whether it’s their name, email address, or any other important information—and store it in a variable for use later in the conversation. This allows your chatbot to build dynamic, user-friendly interactions.
Step-by-Step Guide: Capturing, Storing, and Accessing User Information
This guide will walk you through how to capture, store, and access user information using the Capture Step in YourGPT Chatbot Studio.
1. Capturing User Information
Step 1: Add the Capture Node
Drag and drop the Capture Node onto the canvas or into the block where you want to ask for the user’s input.
Step 2: Open the Capture Node
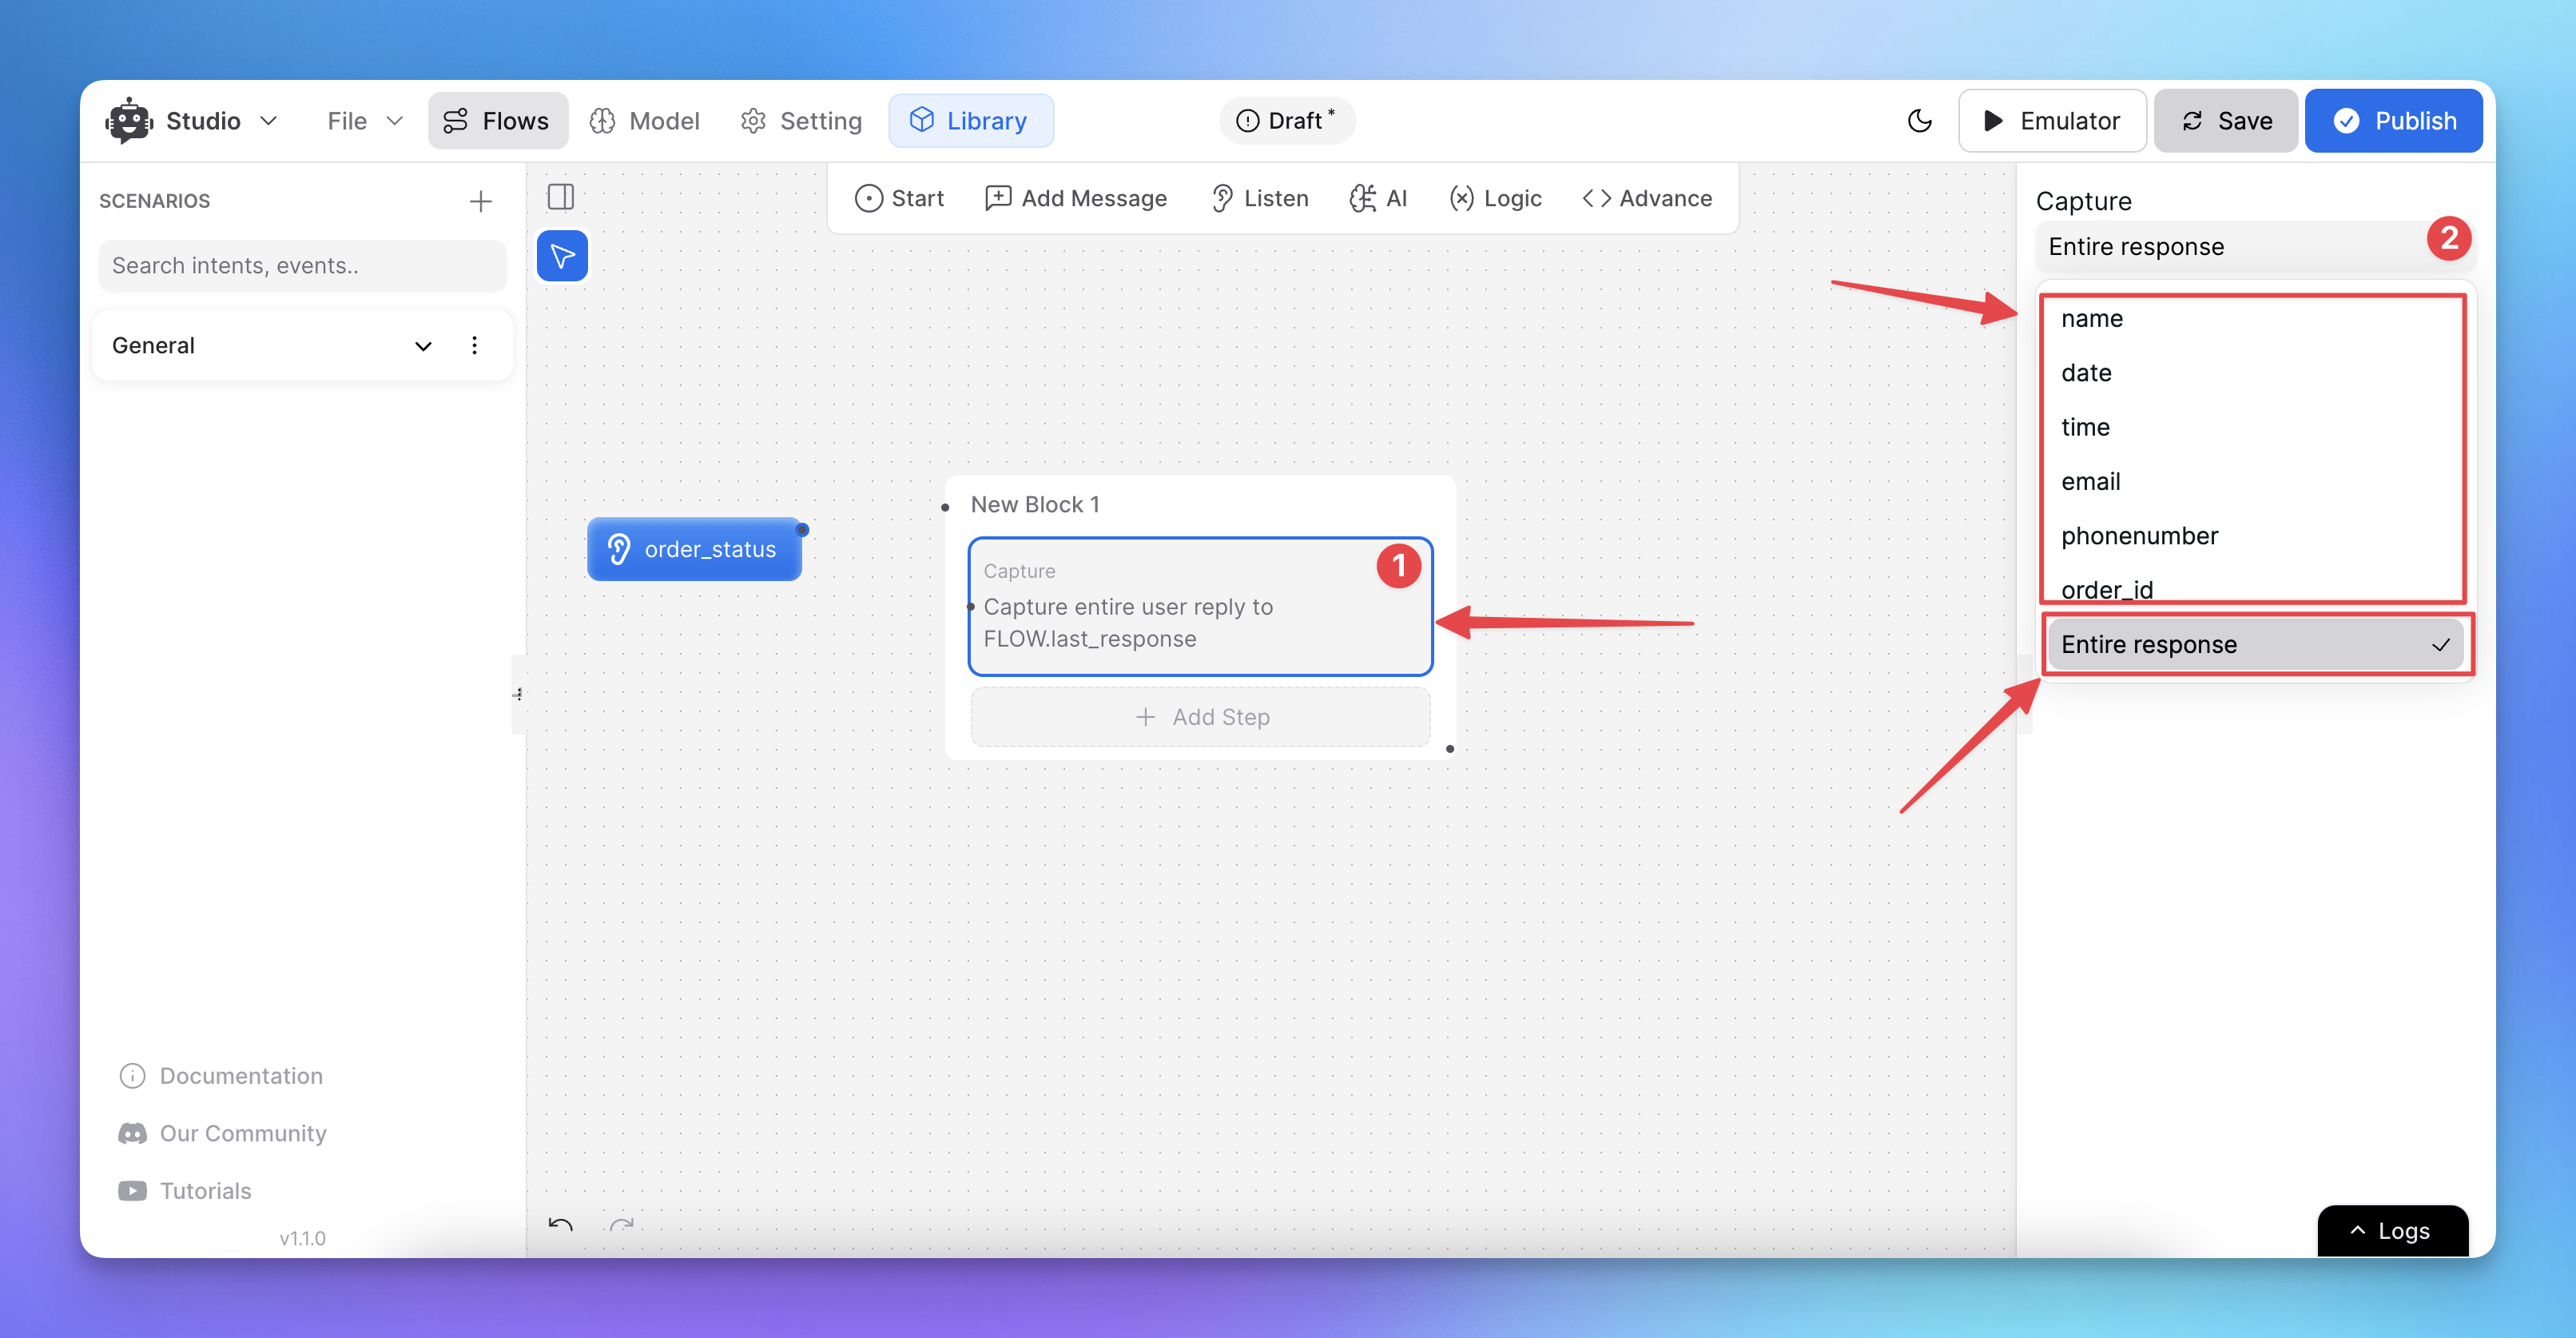
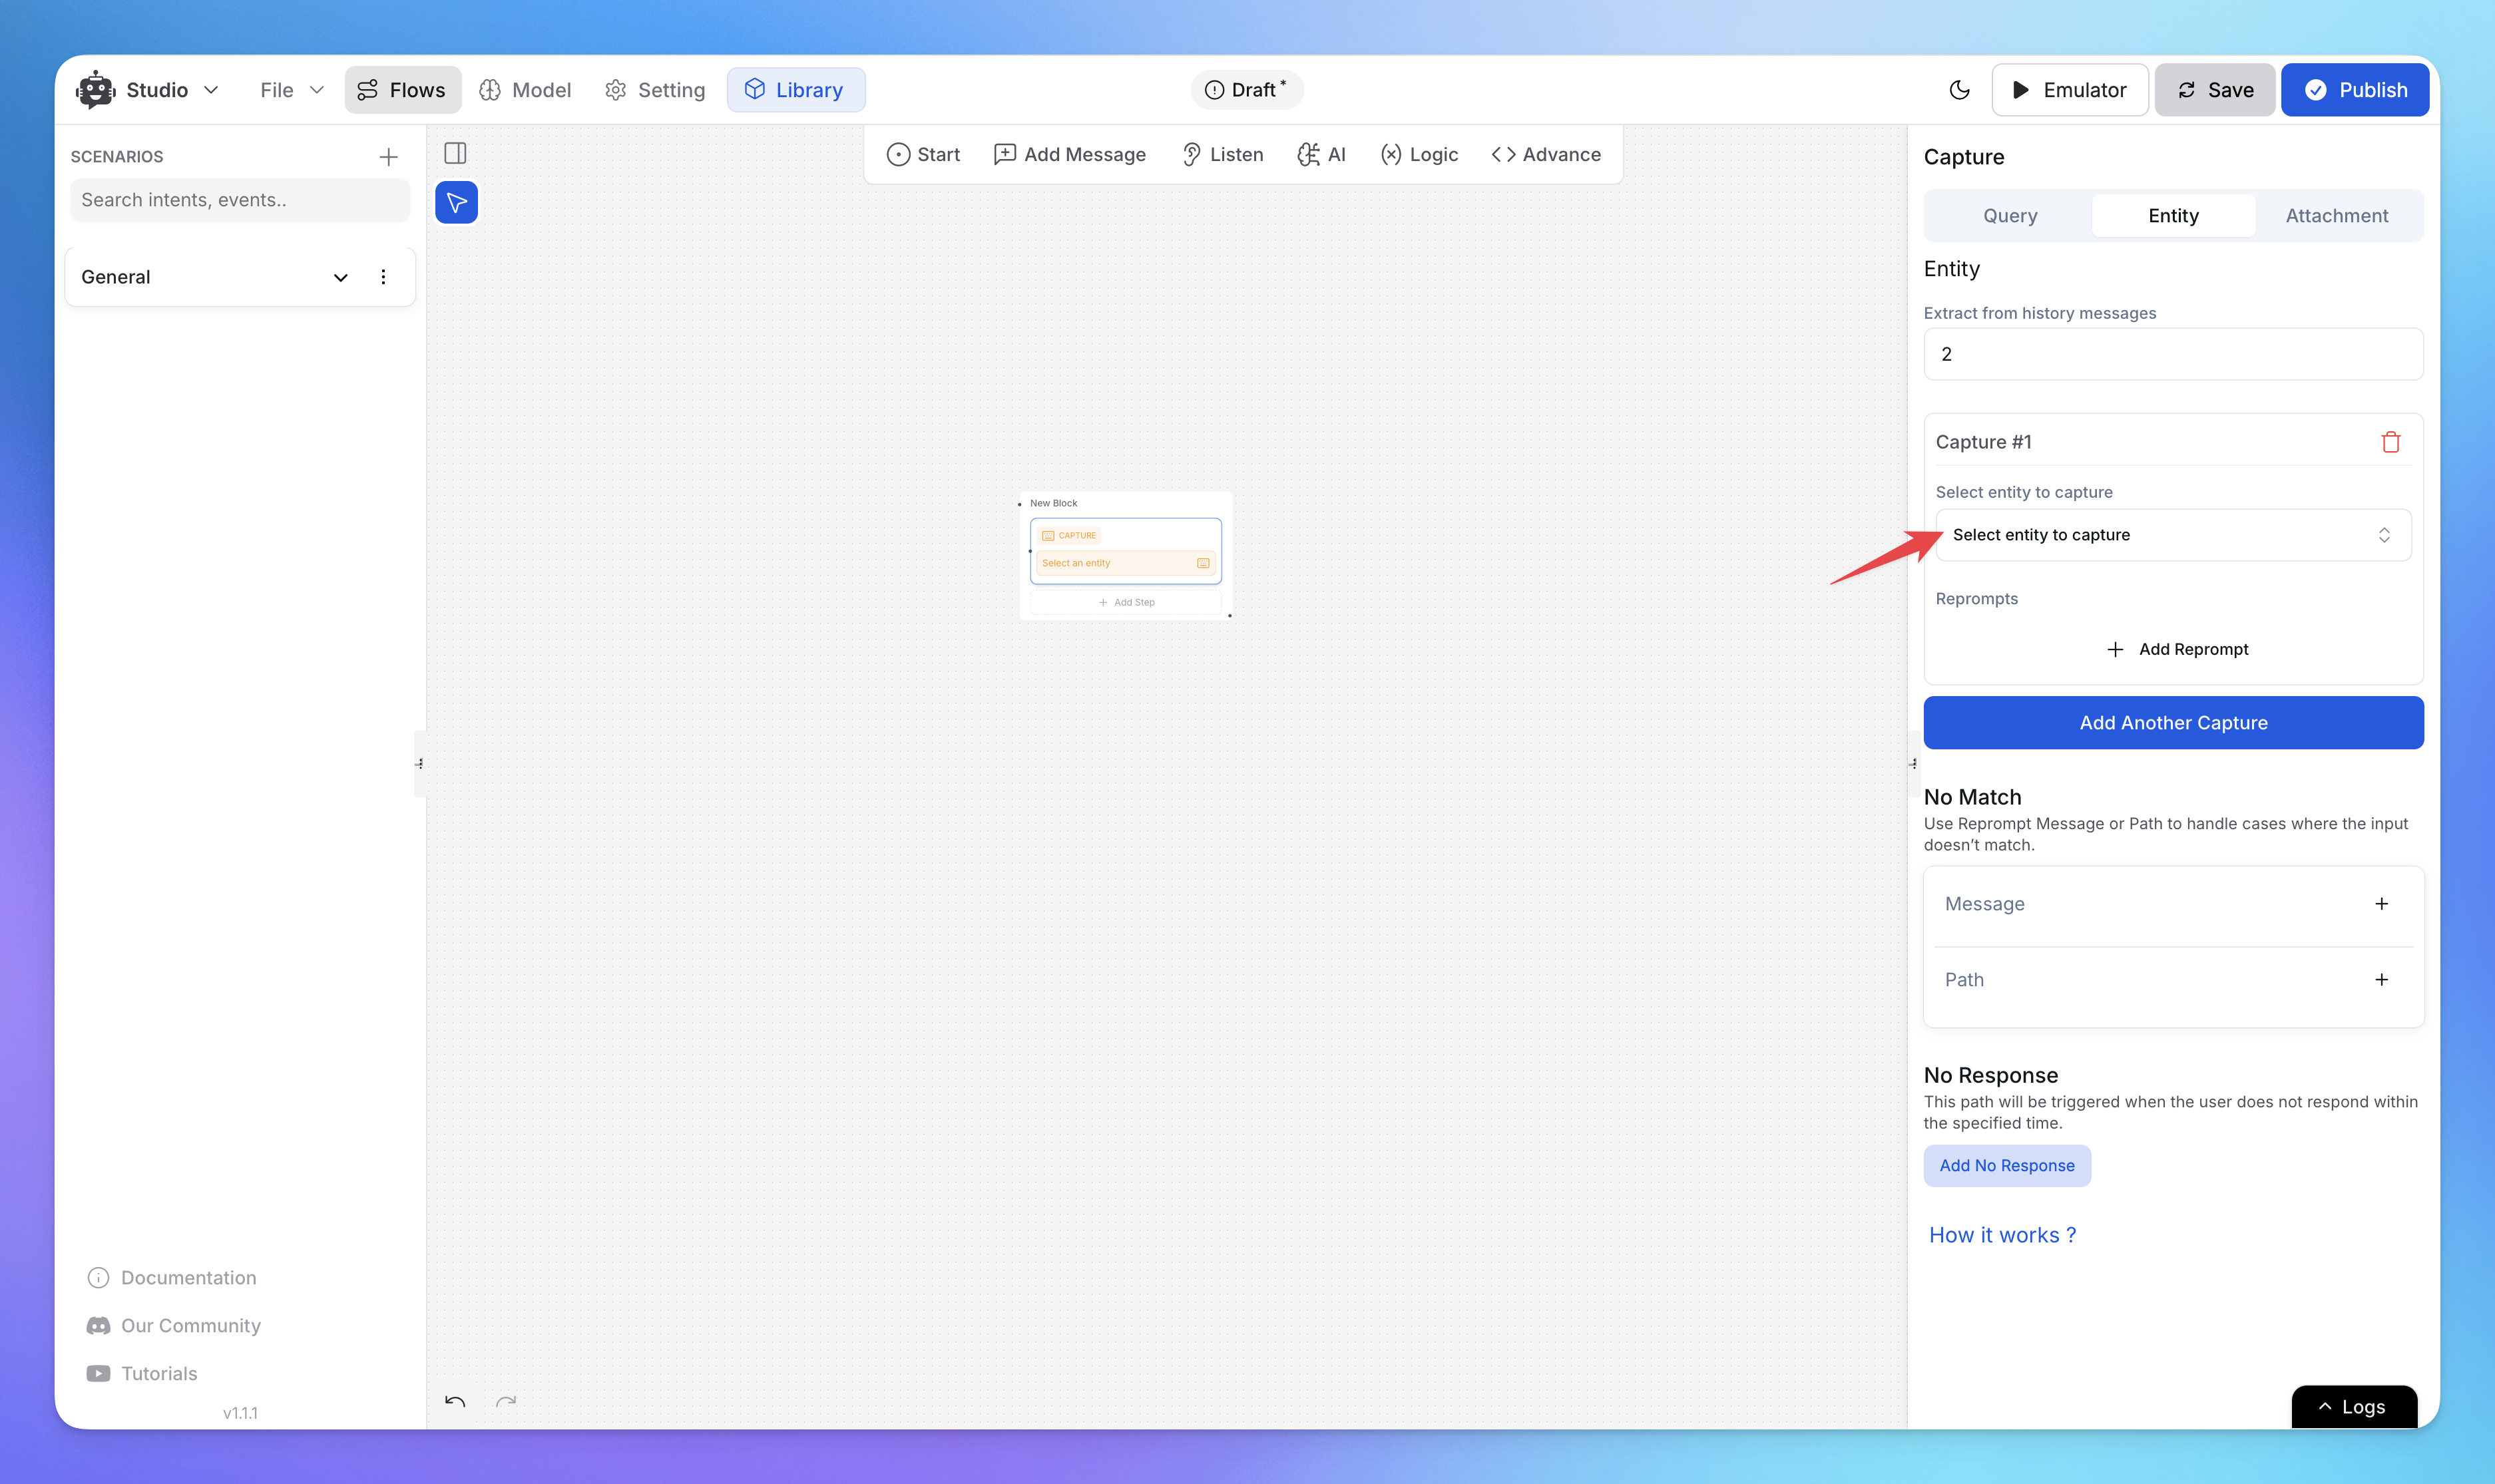
Click on the Capture Node to open the details panel on the right.
You’ll see two options for capturing the user’s input:
Entire User Response
Capture any specific Entity
Capturing the Entire User Reply
Step 3: Select “Entire User Reply”
Choose the Entire User Reply option to capture and store the user’s entire message.
Select or create a variable to store the captured reply:
Navigate to Model ➝ Variables ➝ Add New to create a new variable if necessary.
Note:
Variables used in this step will last for the duration of the flow. Ensure you understand the difference between flow and session variables.
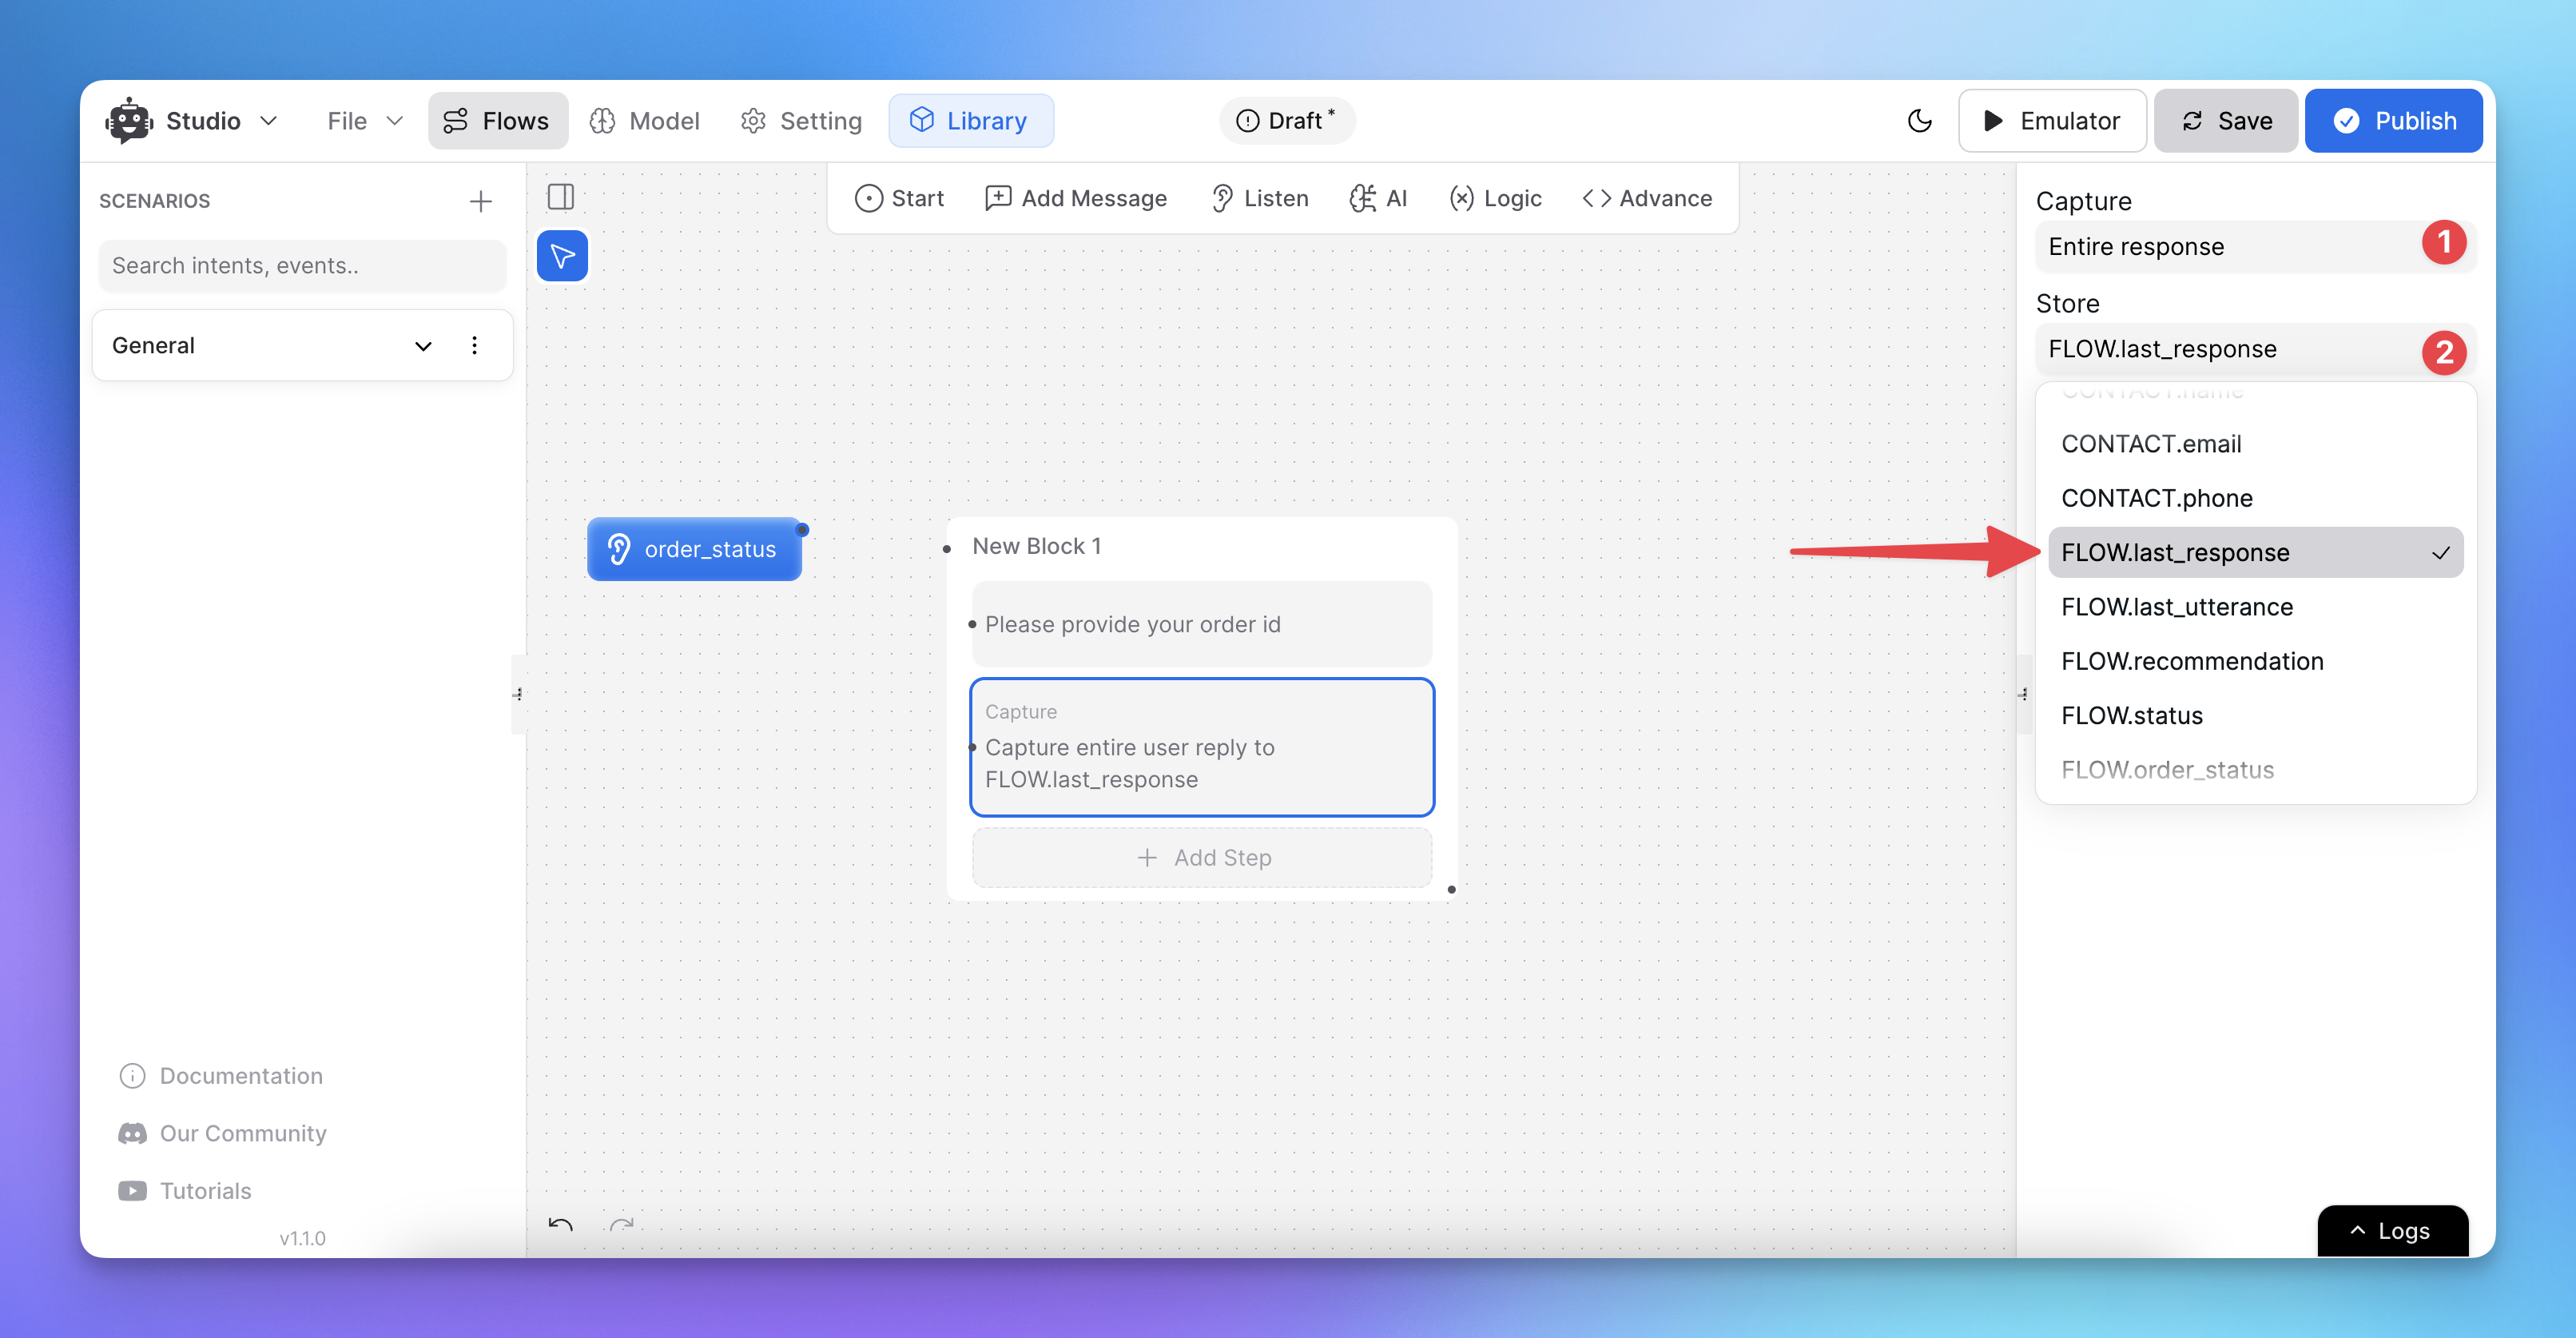
Step 4: Storing User Inputs
Captured data will be stored in the variables you assigned during setup.
There are different types of variables such as Flow Variables (exist only during the current flow) and Session Variables (persist across multiple sessions with the same user); check out more about variables in this YouTube video.
Example:
To store an entire user reply, assign it to FLOW.last_response.
Note:
Flow variables are destroyed when the flow ends, while session variables last across multiple user sessions.
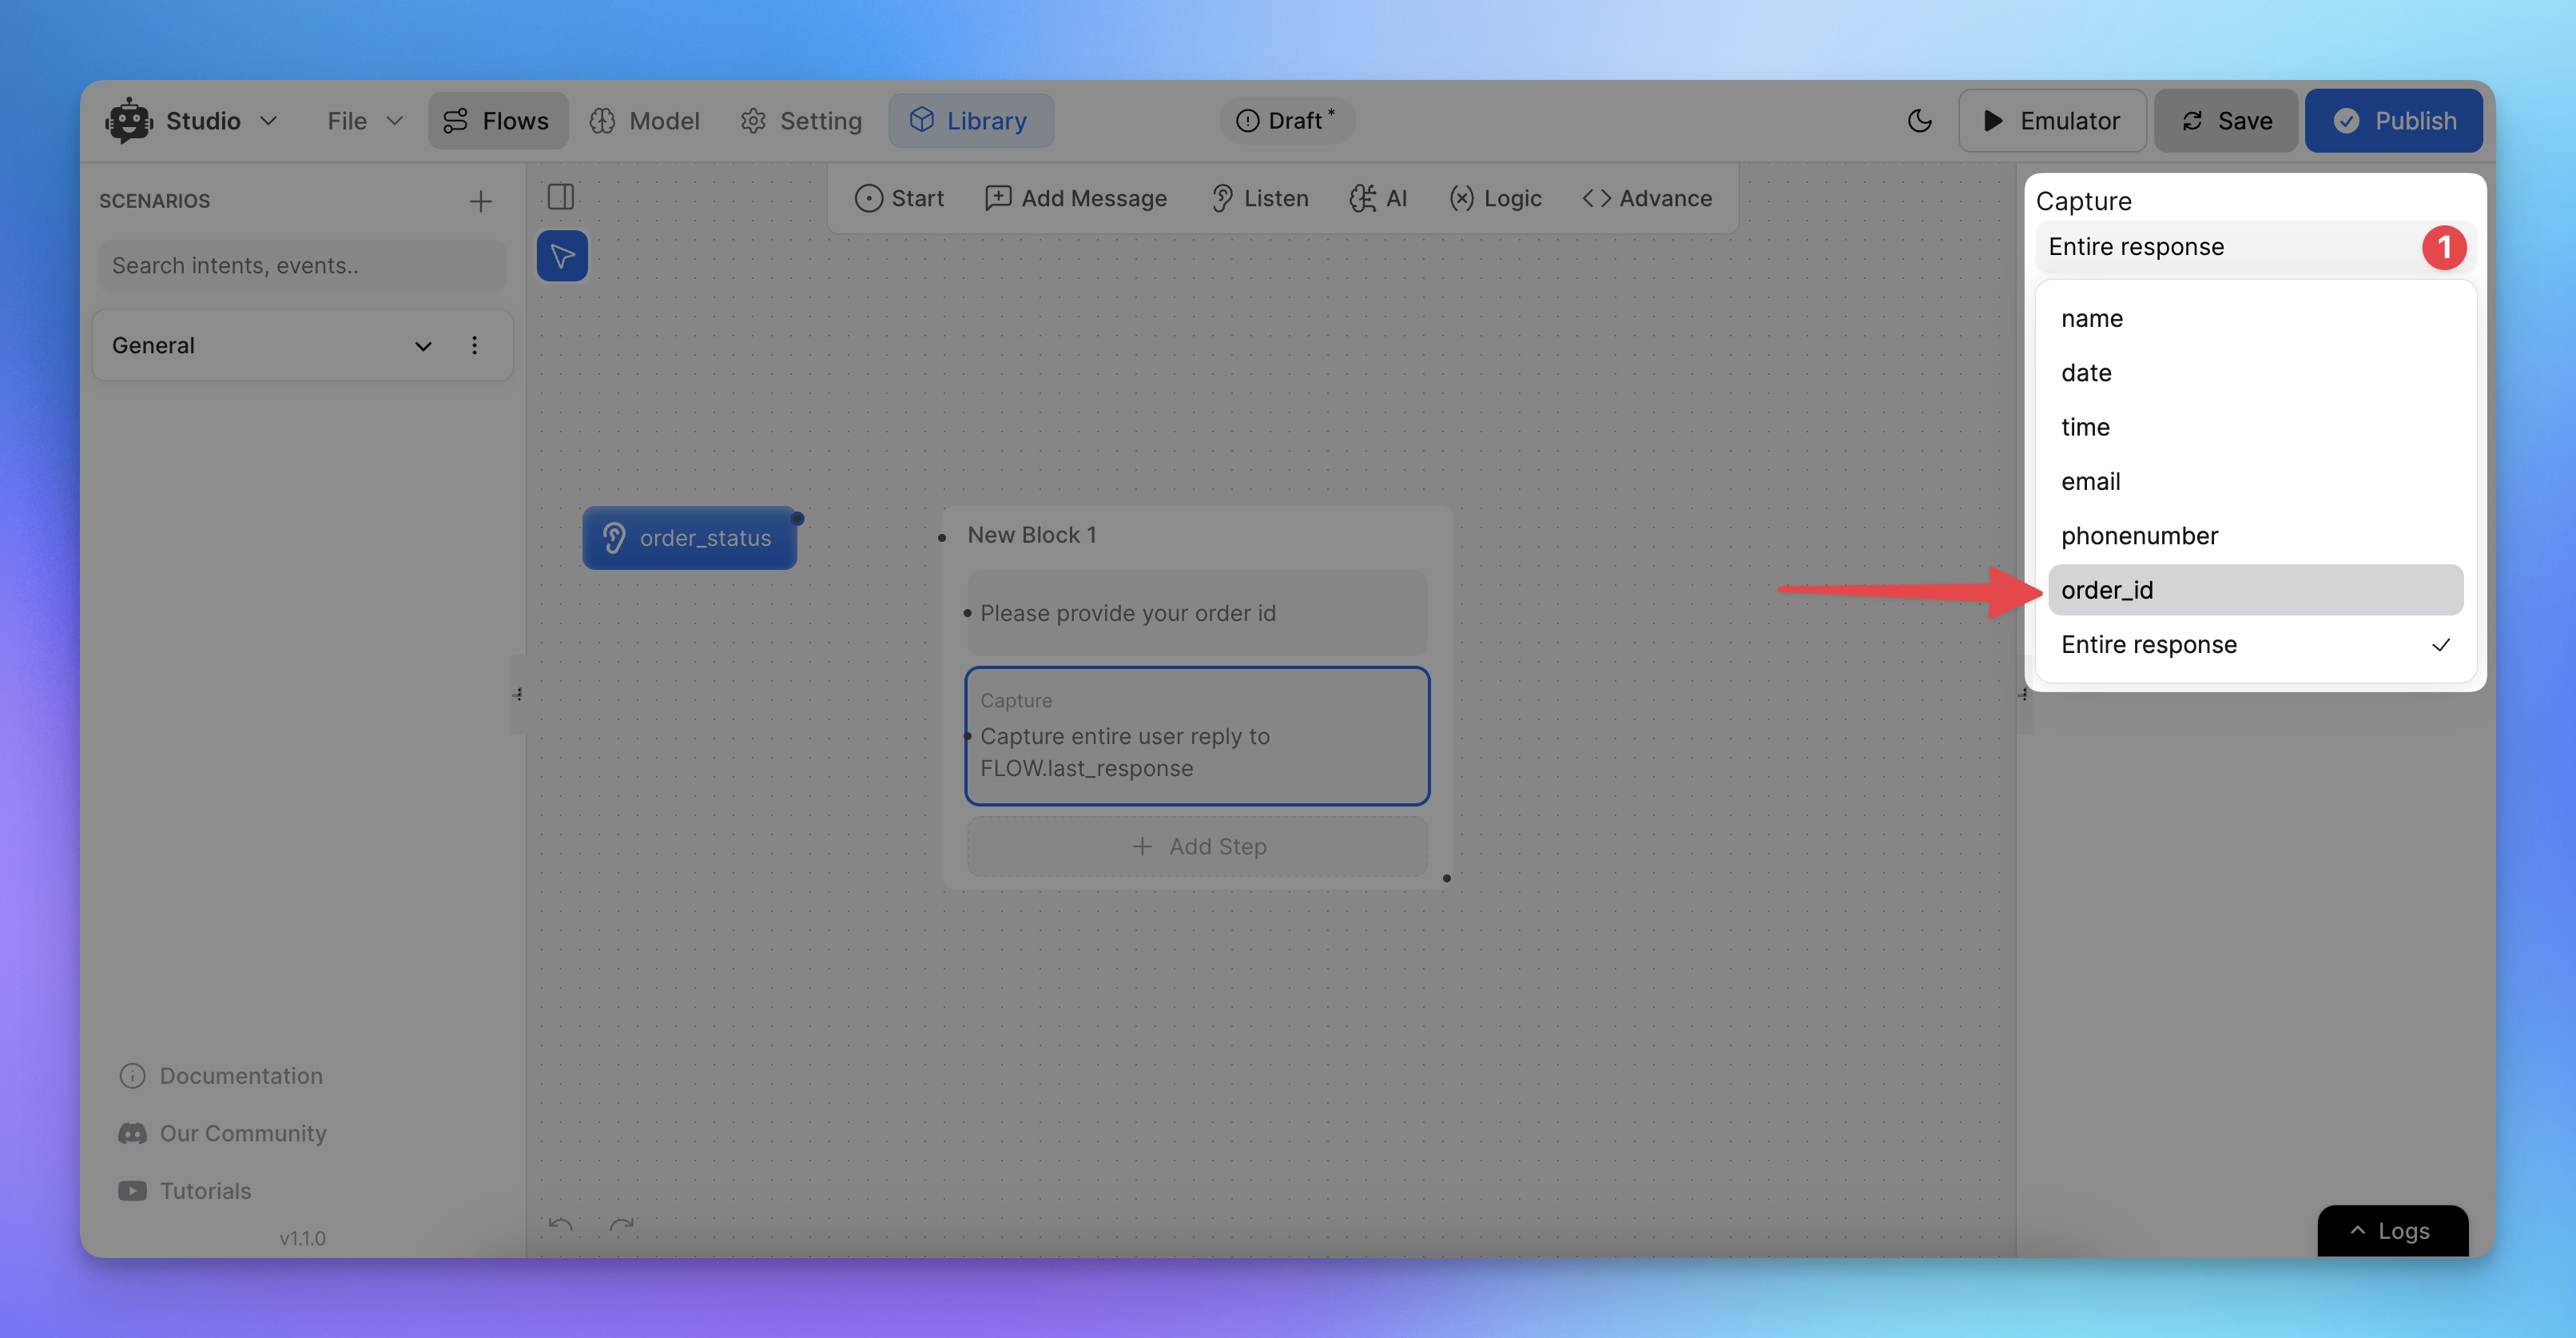
2. Capturing Specific Entities
Instead of capturing the entire message, you can extract specific entities (e.g., name, email, order ID, country) from the user’s response. Just add the message on which
You can also create custom entities to capture more specific information. Simply go to Model ➝ Entities ➝ Add Entity to set up your own.
If you need to learn more about creating entities, check out our documentation or watch our detailed YouTube video guide to better understand how entities work.
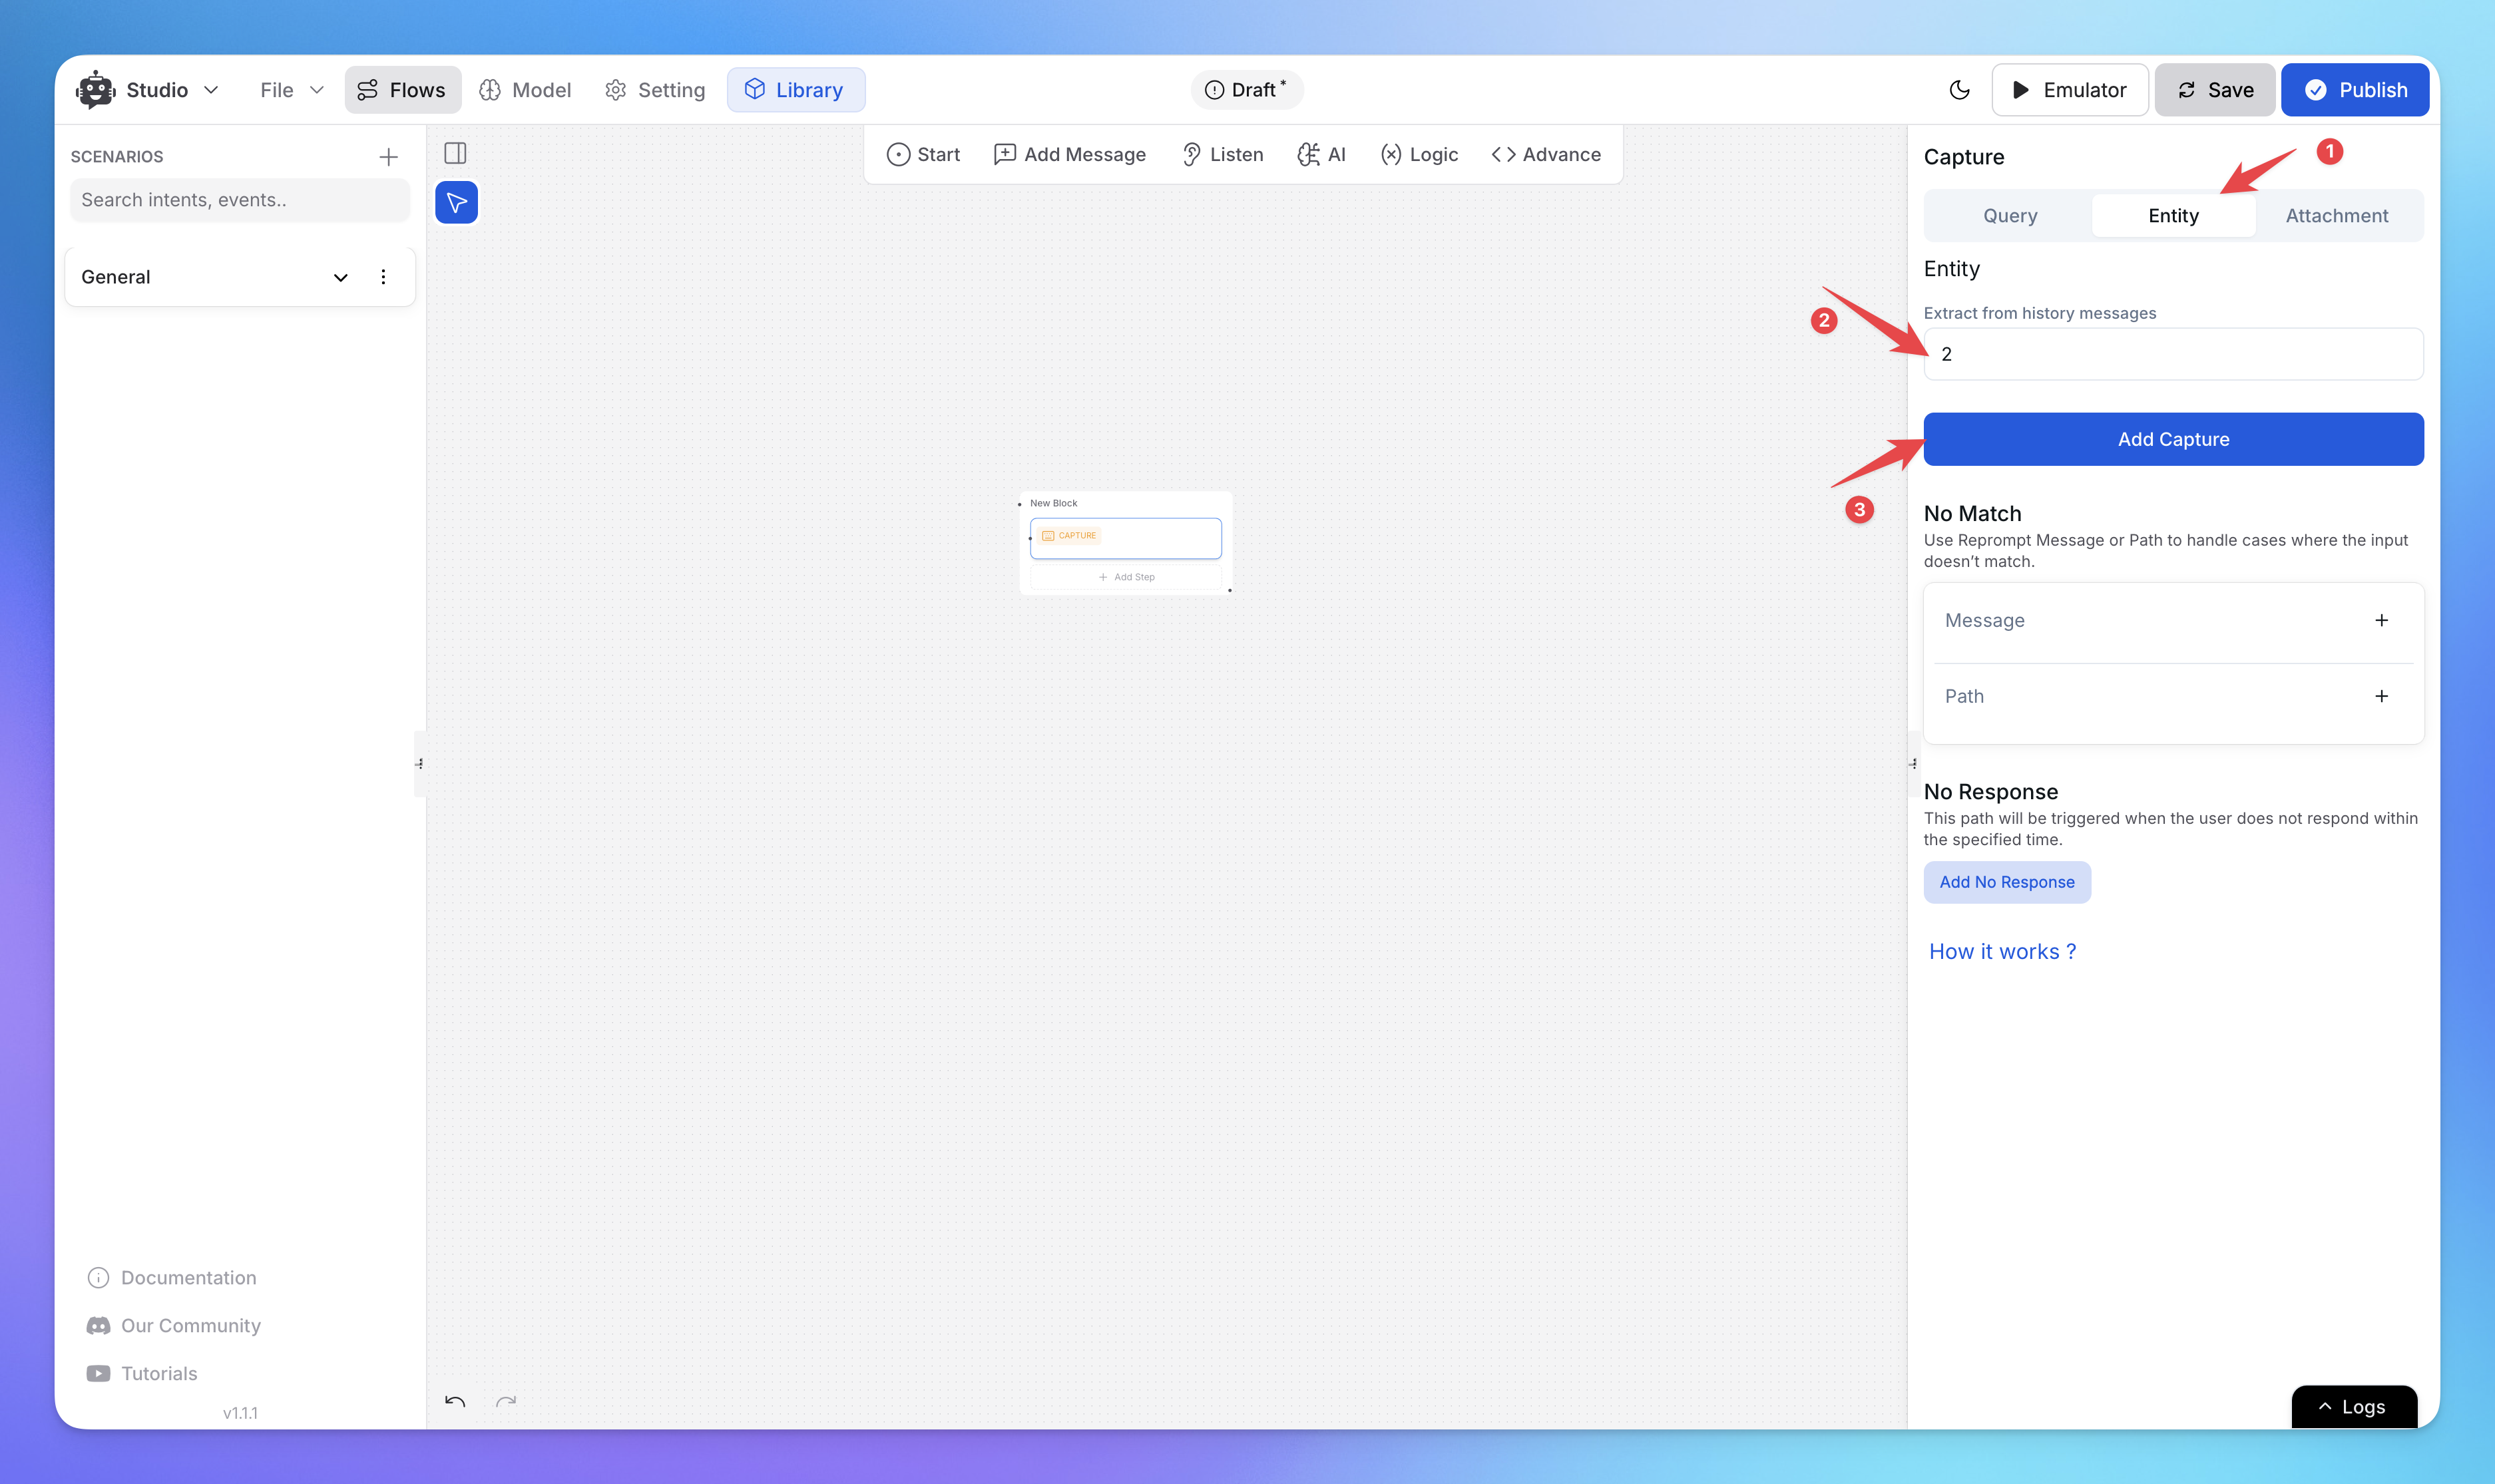
Step 1: Configuring Entity Prompts
If the user’s response doesn’t include the expected entity, the assistant will prompt them for the correct information.
For example, if you ask for an order ID and the user responds with “hello,” the system will trigger the entity prompt again, requesting the correct order ID.
Customize these prompts in the details panel.

Access entity captures using
{{FLOW.entity_name}}, e.g.,{{FLOW.order_id}}.
Handling No Match and No Reply Scenarios
No Reply: Occurs when the user does not respond.
No Match: Occurs when the user’s response doesn’t match the expected input.
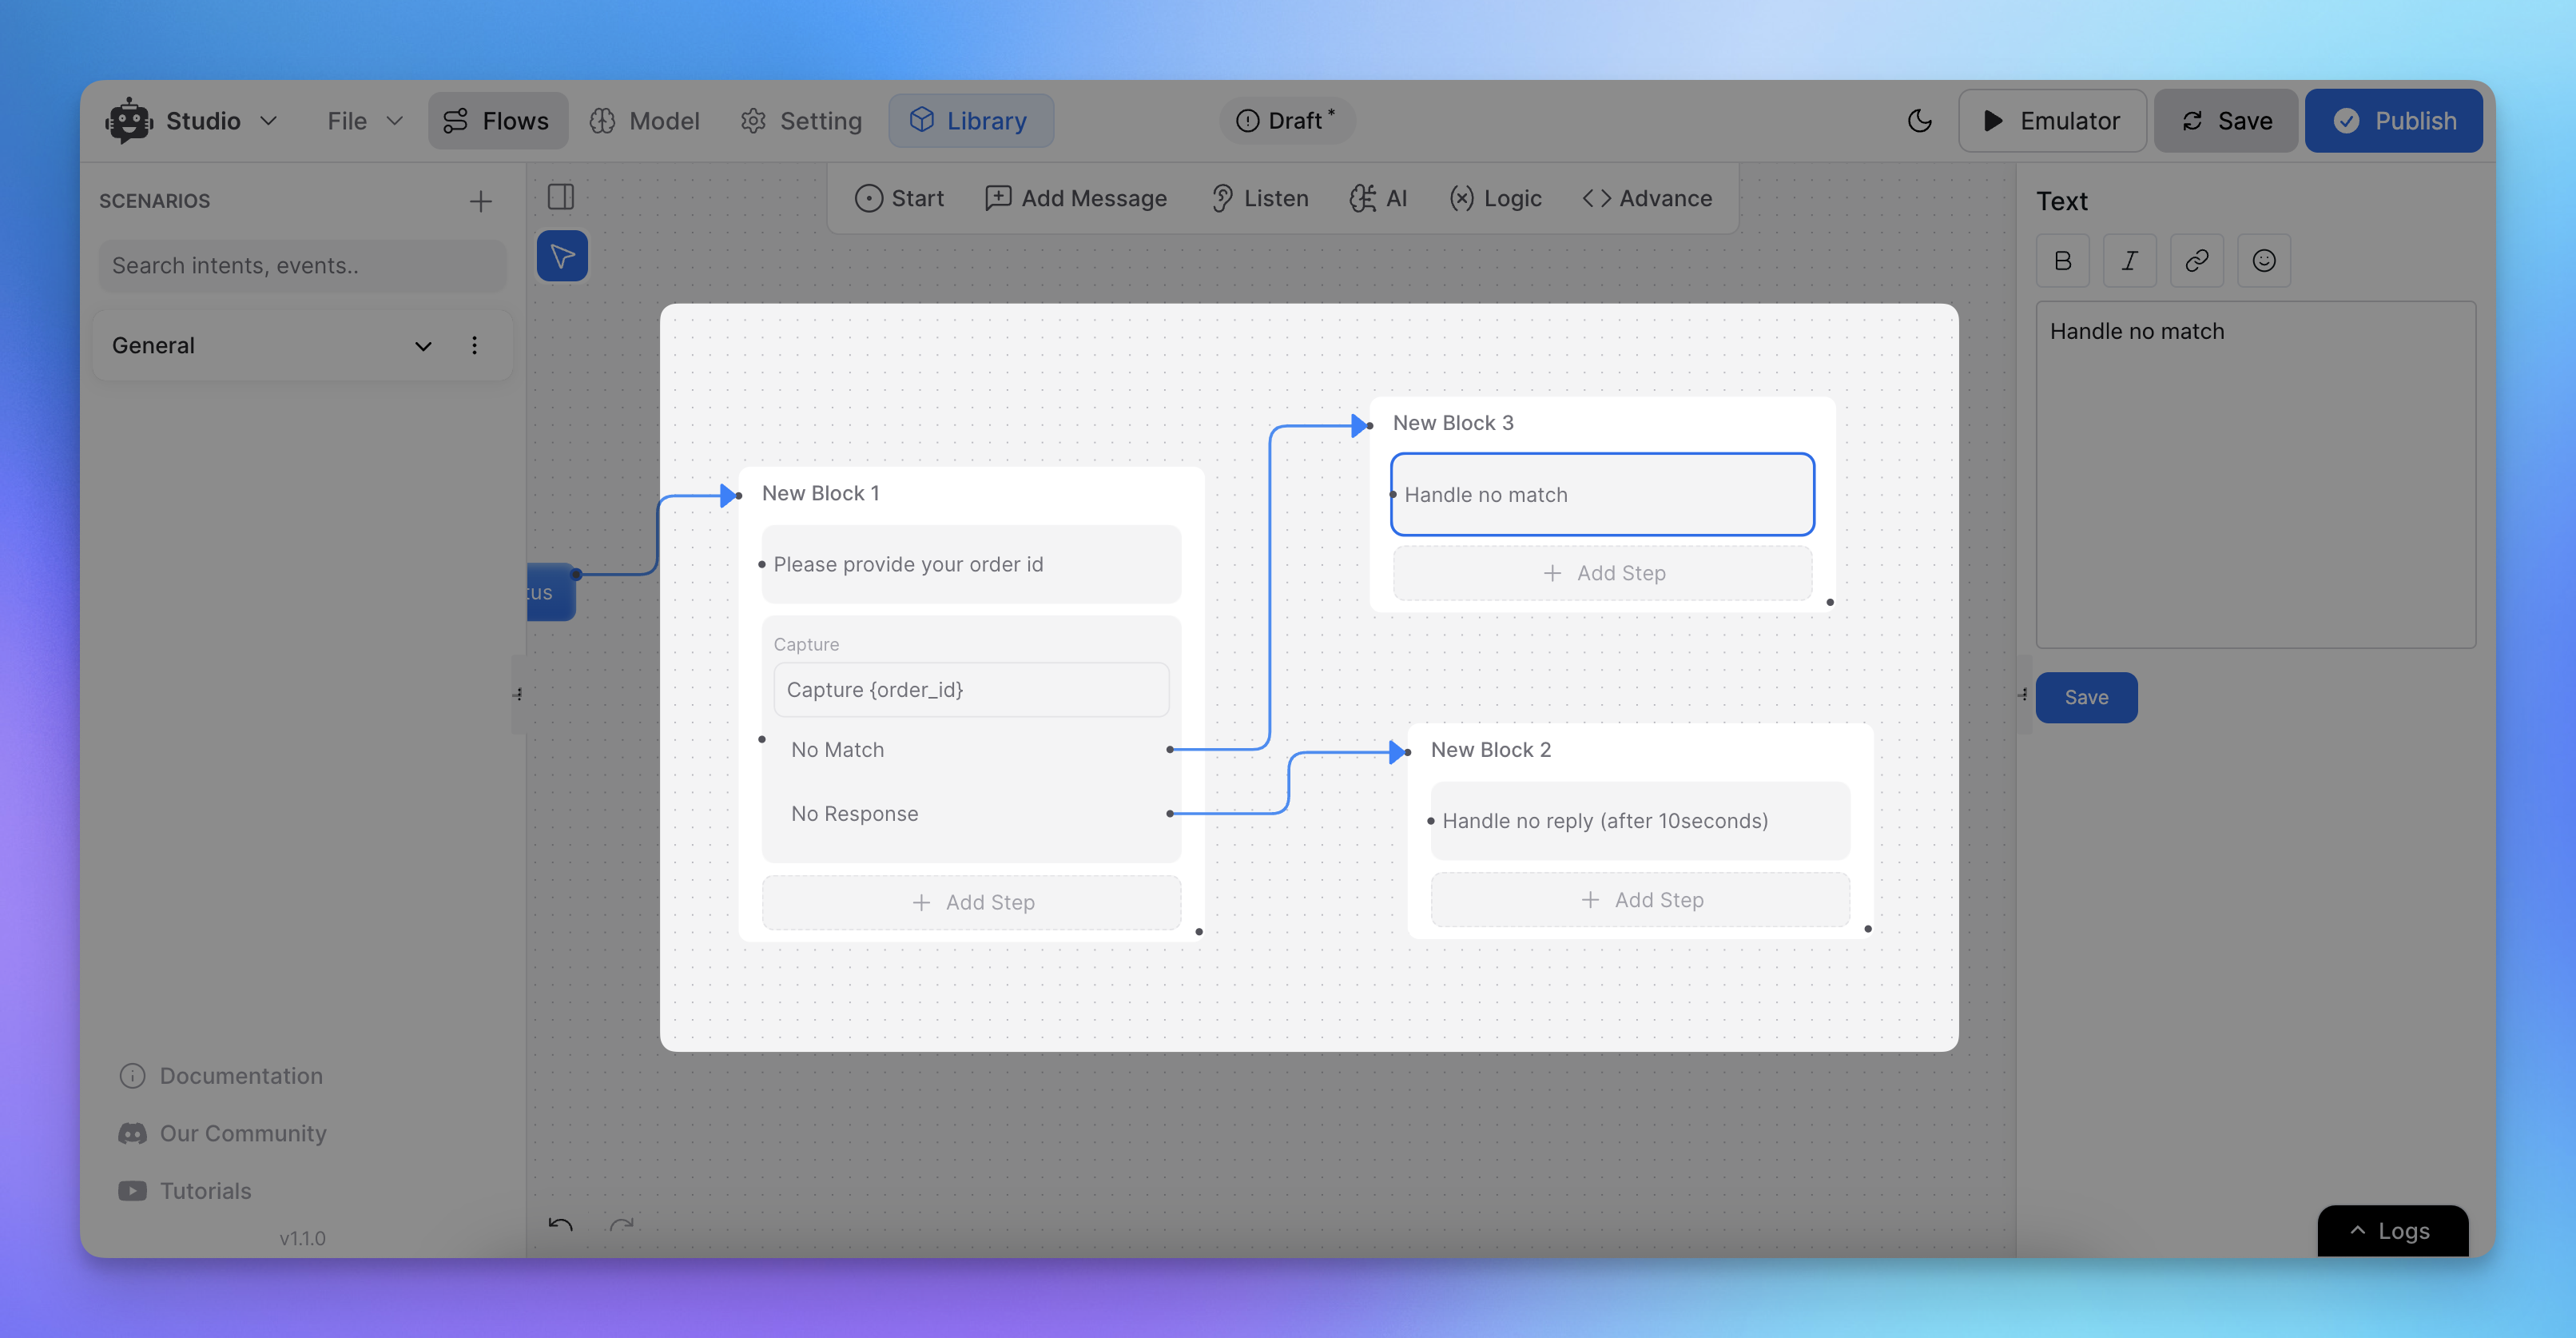
In these cases, you can:
Add a fallback conversation path under No Match.
Configure a No Reply path to prompt the user again.
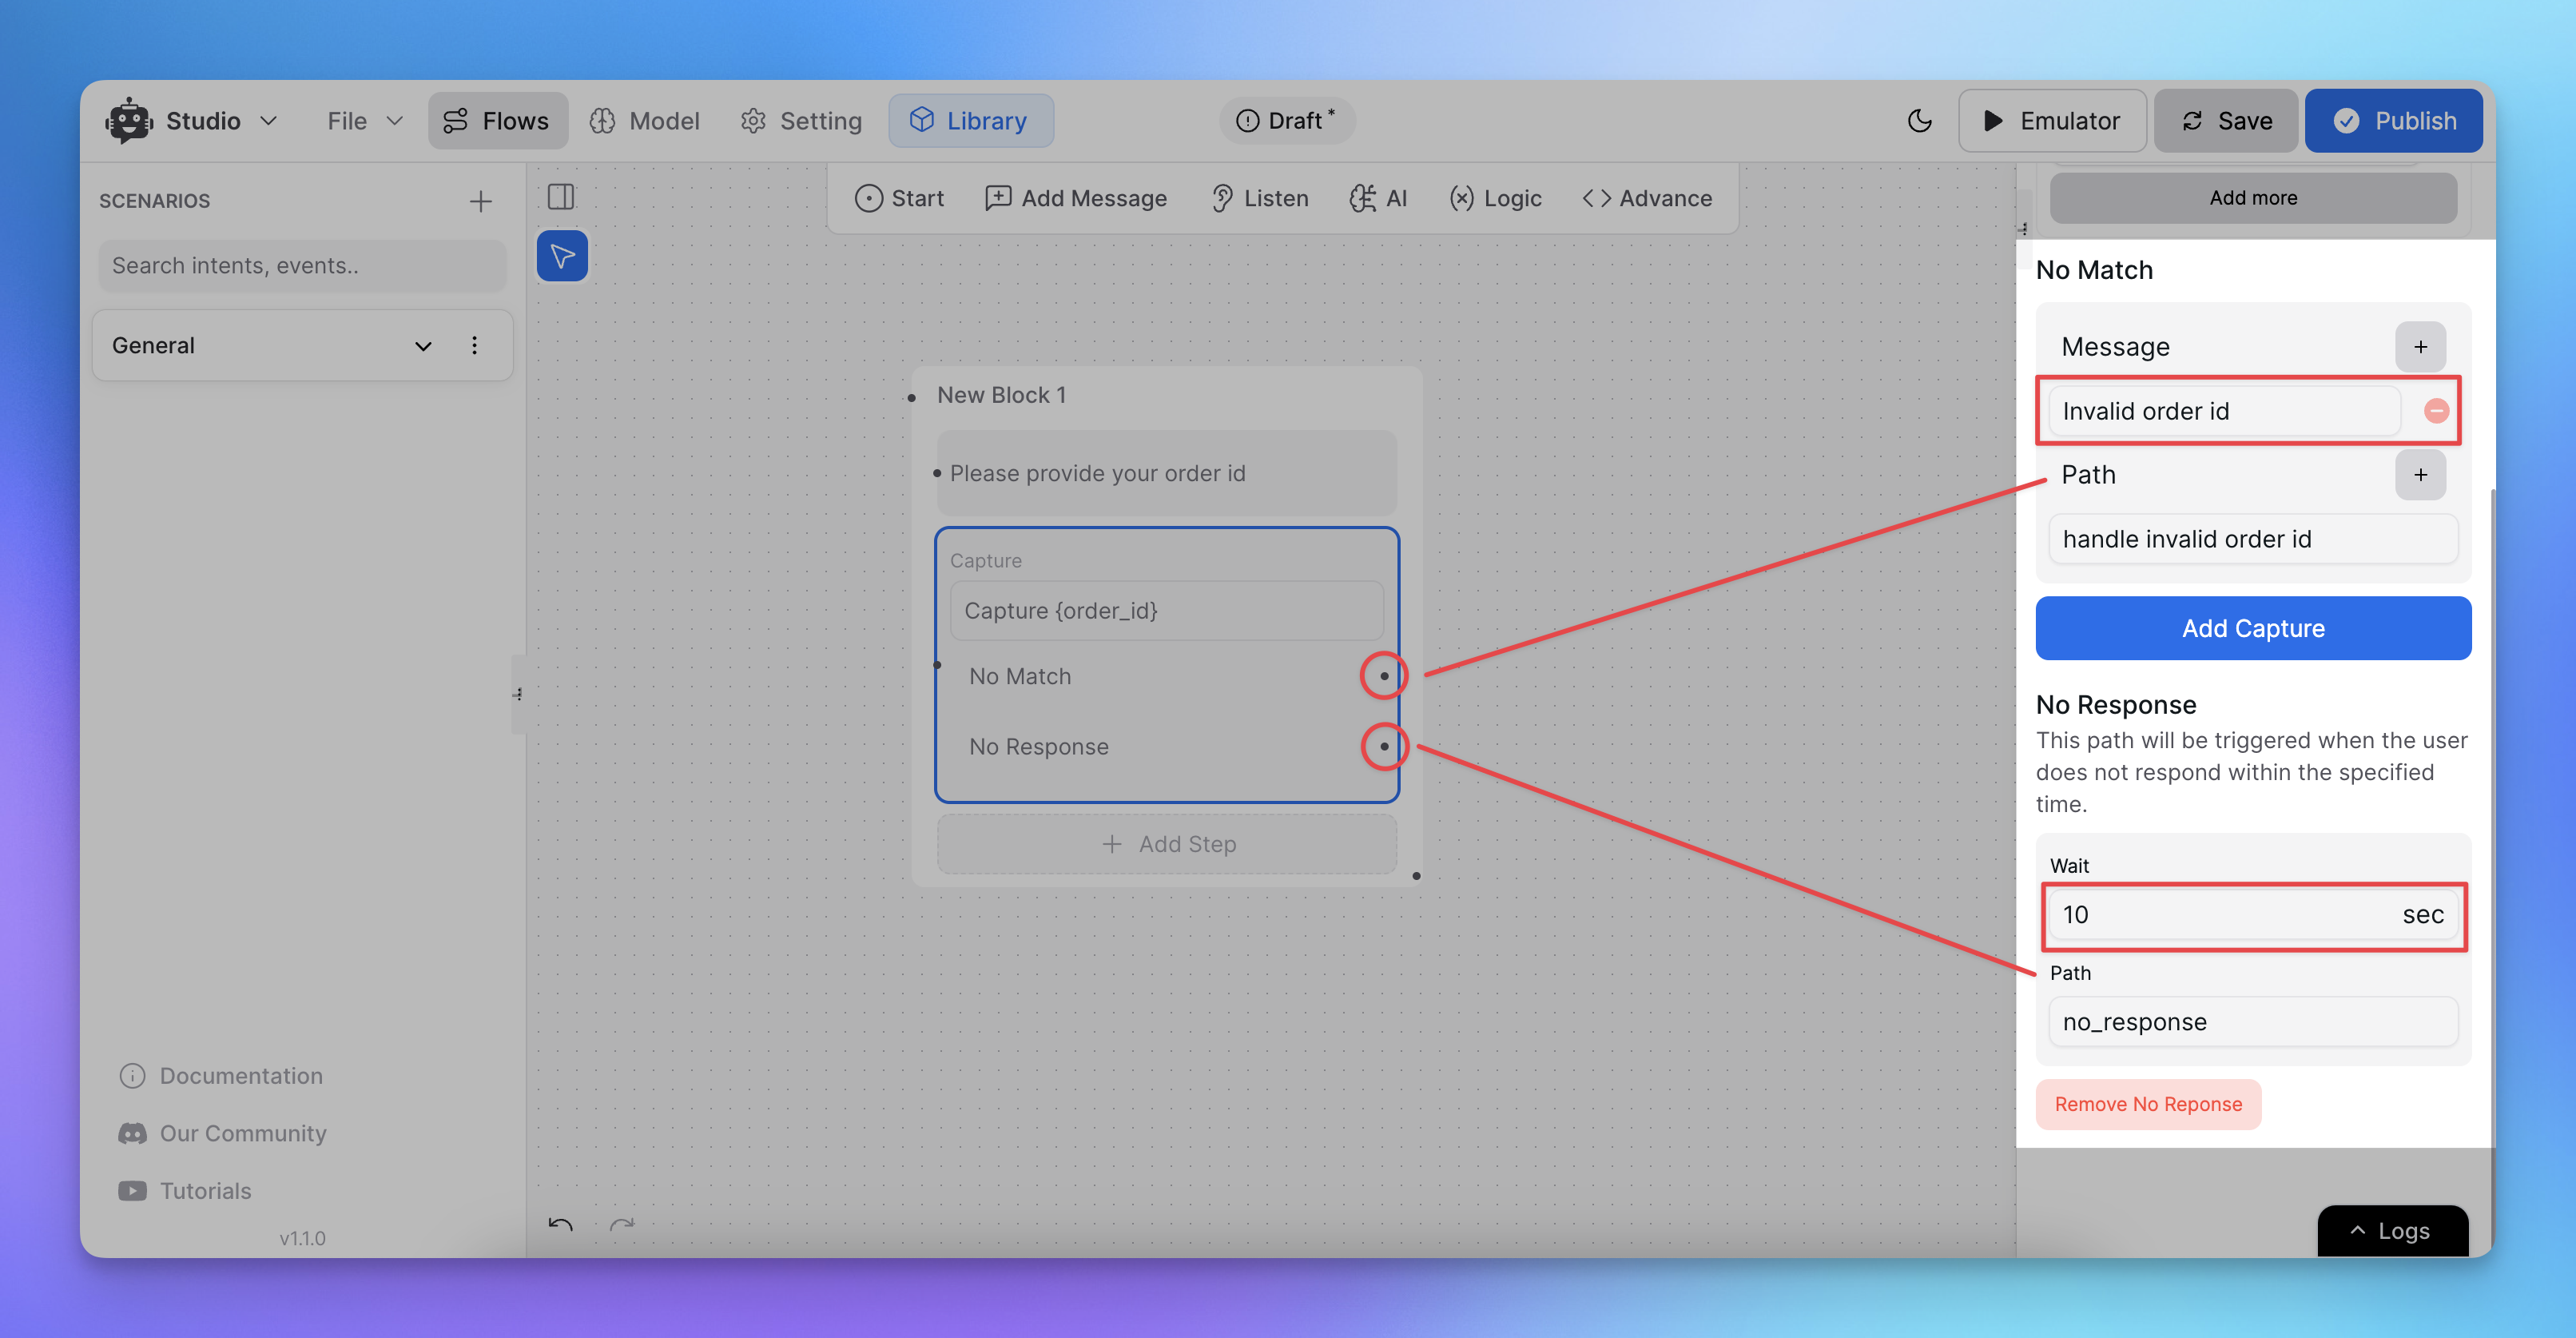
Note: Adding proper fallback options helps improve user experience by guiding them down the correct path when a misunderstanding occurs.
3. Capturing Attachments
Step 1: Add the Capture Node
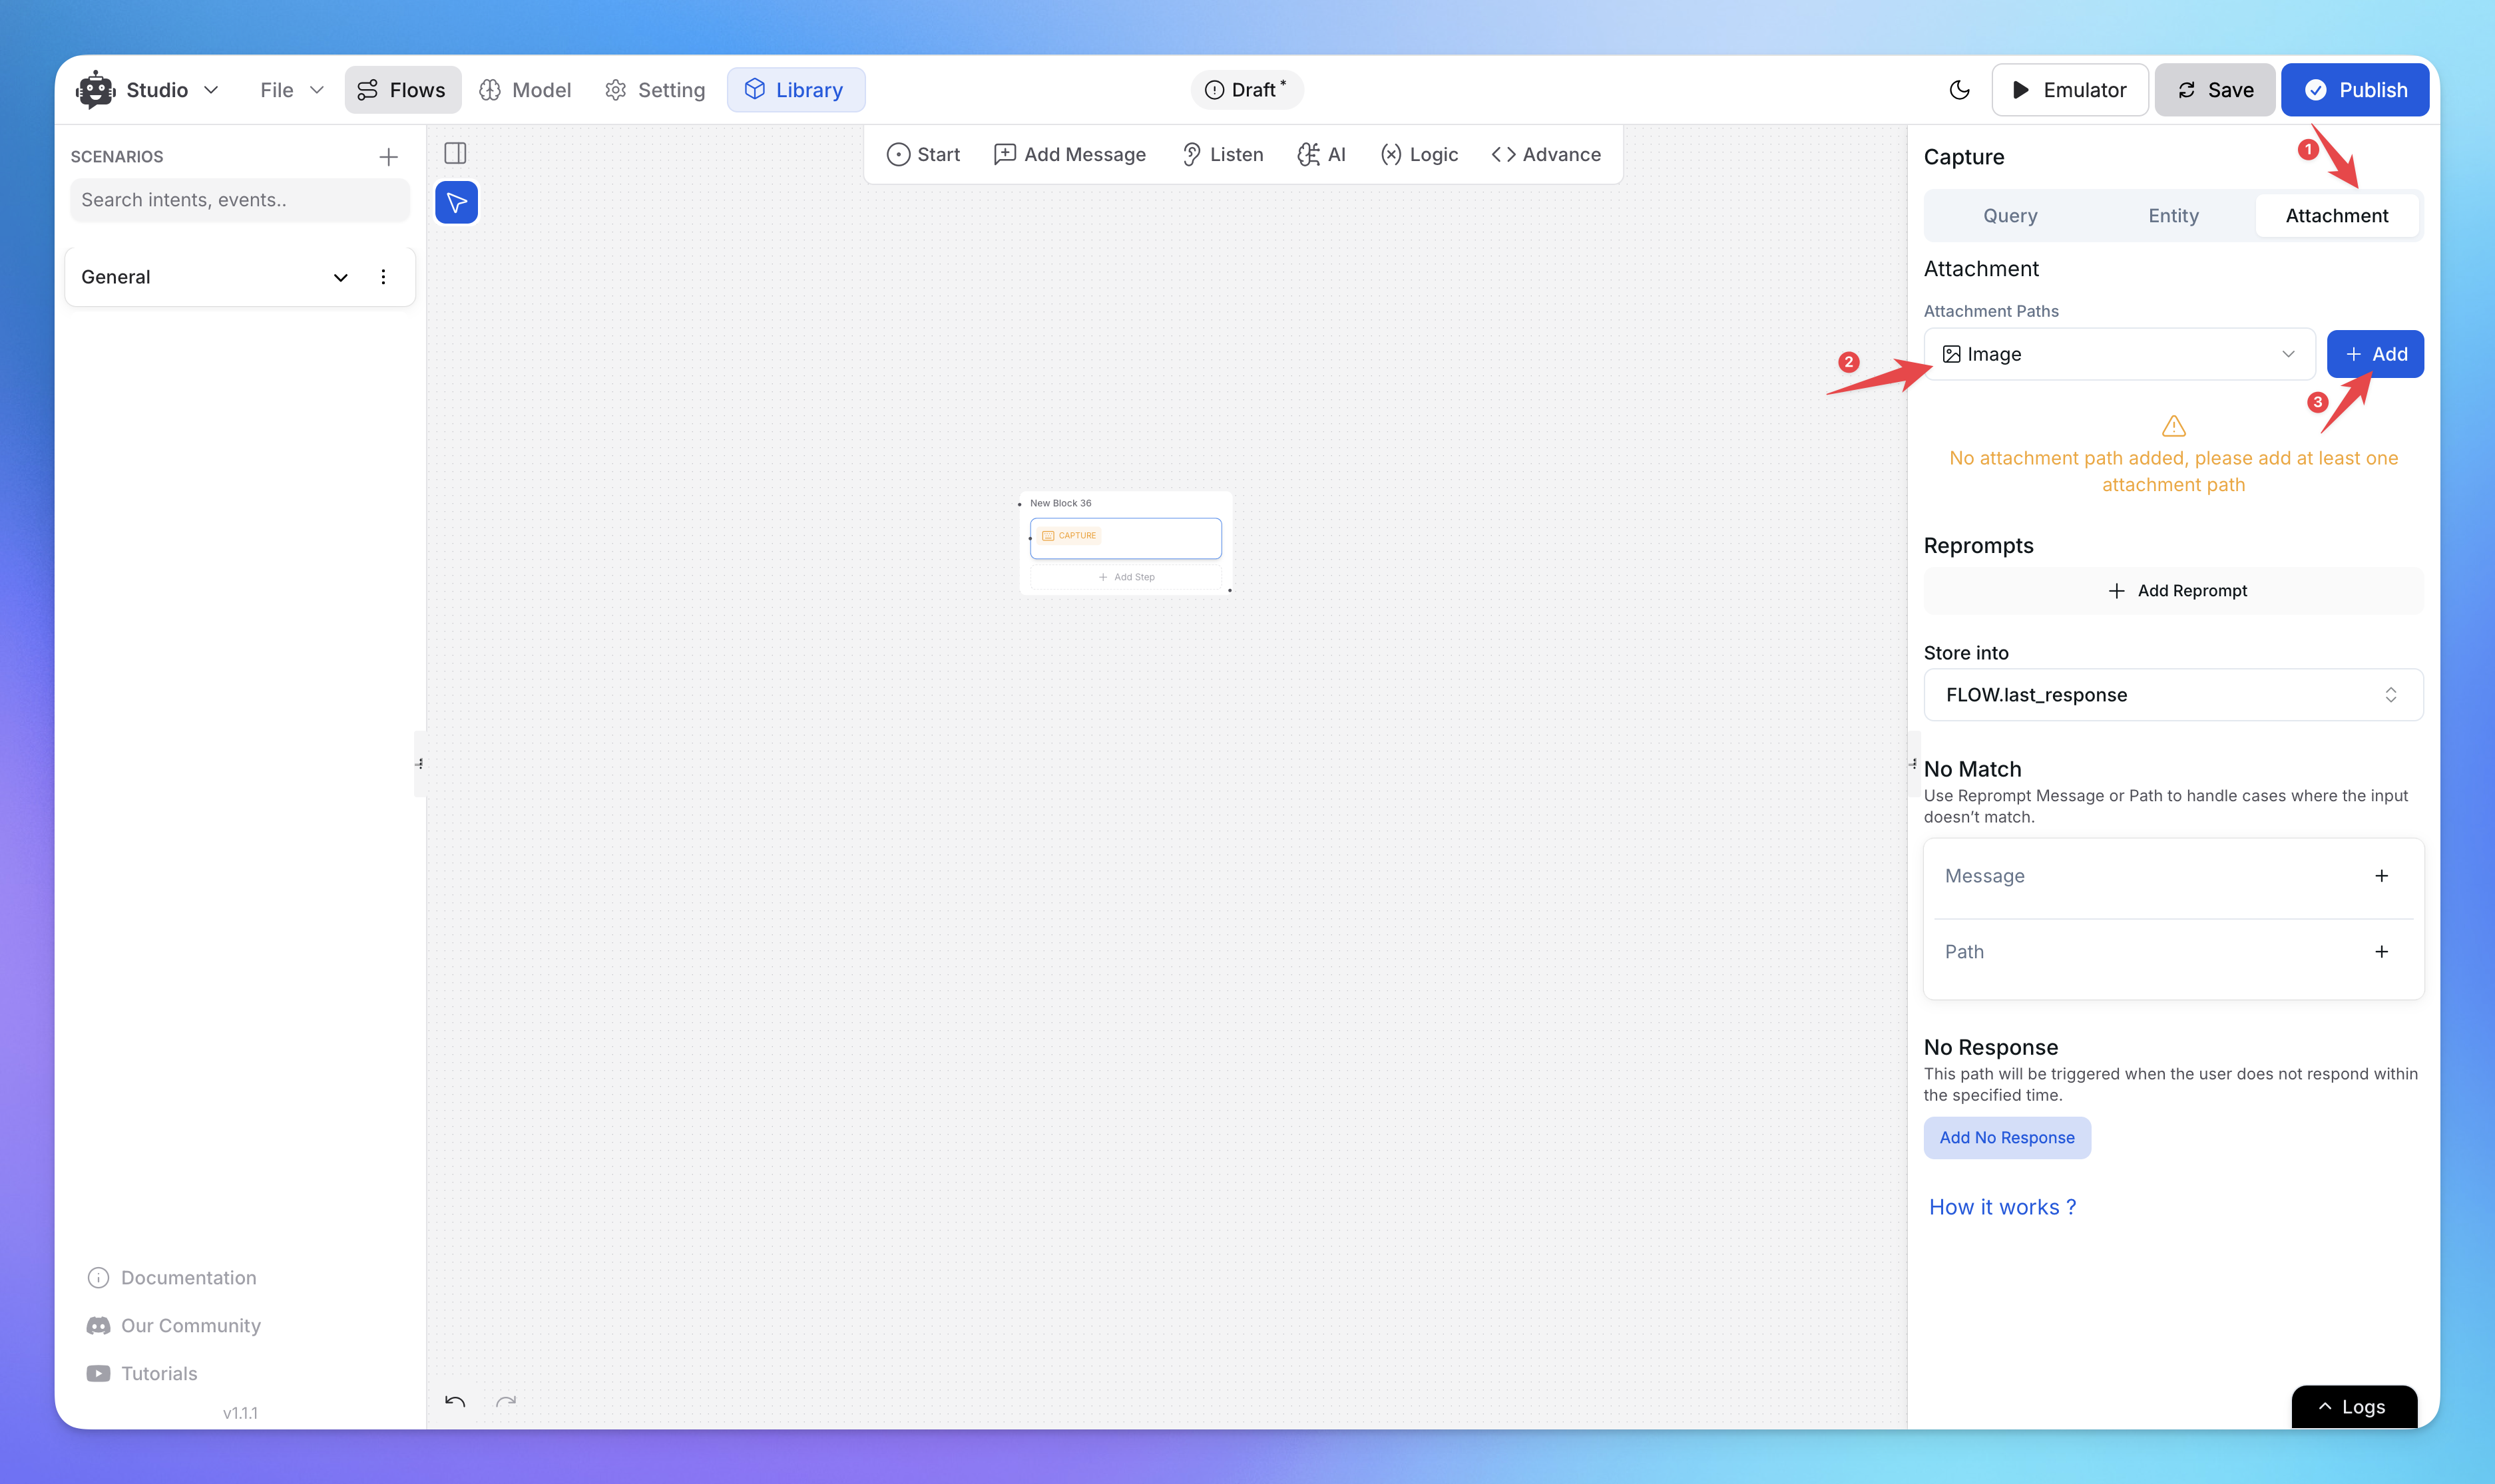
Click on the Capture Node to open the details panel on the right.
You’ll see different capture options: Query, Entity, and Attachment. Select the Attachment tab.
Step 2: Choose Attachment Type
Under Attachment Paths, click the dropdown and select the type of file you want to accept:
Image – Accepts image uploads (JPEG, PNG, etc.)
Video – Accepts video files (MP4, MOV, etc.)
Audio – Accepts audio recordings (MP3, WAV, etc.)
File – Accepts documents and other files (PDF, DOCX, etc.)
Click Add to confirm your selection.
Step 3: Storing Attachments
Captured attachments will be stored in a variable for later use.
Navigate to Store Into and assign a variable (e.g.,
FLOW.last_response).If you need to create a new variable, go to Model ➝ Variables ➝ Add New.
Testing and Preview
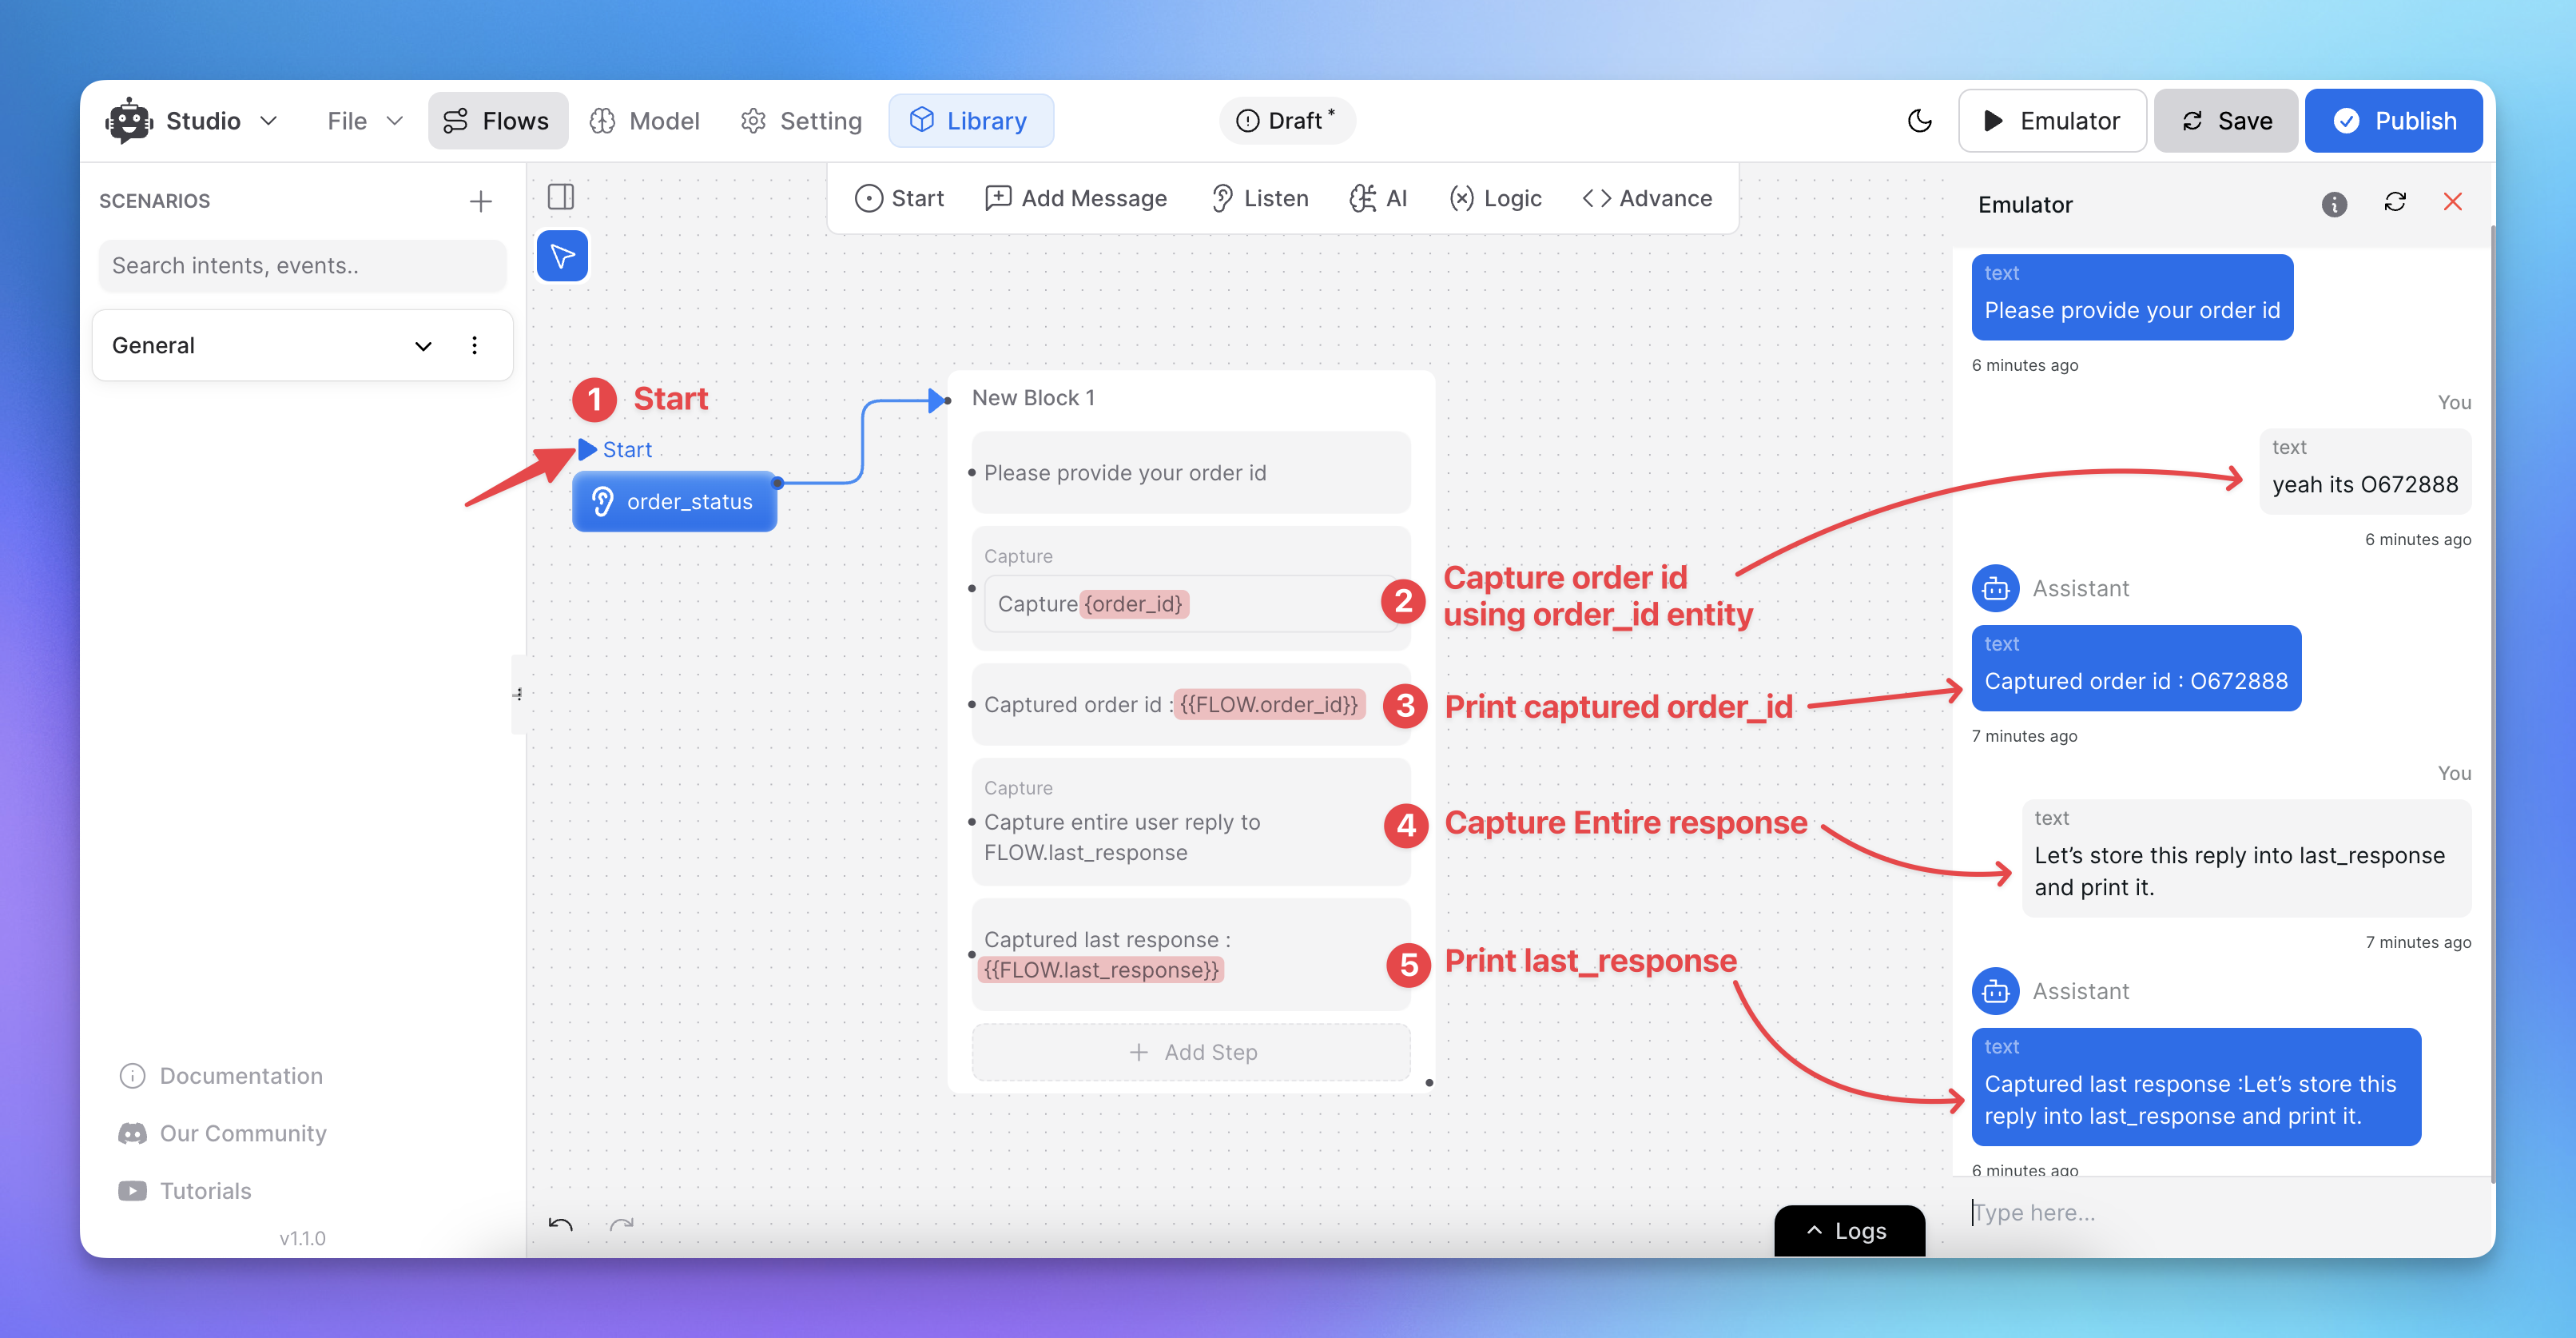
After configuring the capture node, test it using the emulator.
Click the “Emulator Play Icon” button to simulate user interactions.
To verify captured variables, print them in the next step using
{{FLOW.variable_name}}.
Related Articles
How to use Intents in Chatbot Studio?
This guide walks you through creating and using Intents to enhance your chatbot’s capabilities.
Flow : Scenarios, Blocks, Steps & Connections
This article fully details how steps/nodes and blocks work, how to configure them, create paths and connections.
How to Add & Configure Text, Image, and File Messages in Studio
Learn how to send text, images, and files with your ai agent using studio.
How to Debug Flows and View Execution Logs in Chatbot Studio?
Learn how to debug your flows, check flow execution logs, and view logs within the Chatbot Studio
How to Set Up Conditions in AI Studio
Set Conditions to Understand What Information Users Are Looking For
How to create and use forms in AI Studio?
This guide will walk you through the process of creating and using forms to improve the user experience with your AI agent