
How to Configure General Settings in YourGPT Chatbot
The General Settings section in YourGPT Chatbot helps you configure essential chatbot settings for better performance and customization. Here's how to manage these settings effectively:
1. How to Switch Language?
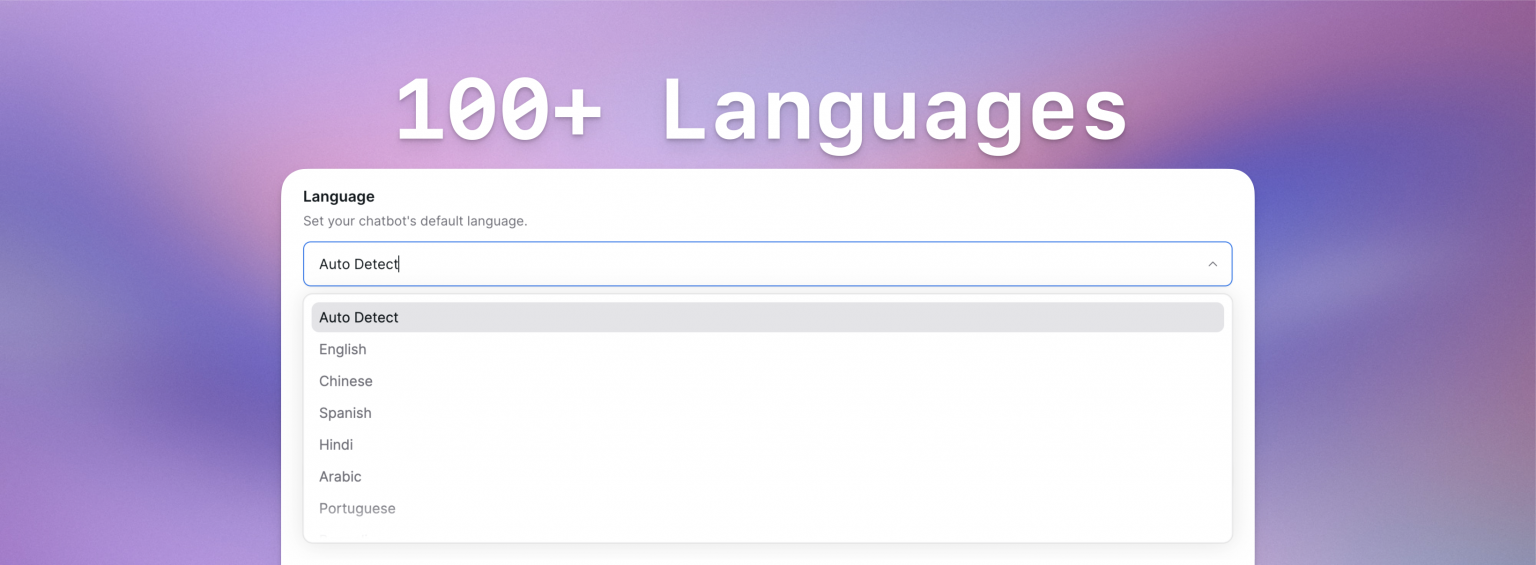
The Language Settings in YourGPT allow you to configure the chatbot's default language for better communication.
Steps to Switch Language:
Go to Settings > General.
Locate the Language section.
Select Auto Detect to allow the AI to respond in the language used by the user.
Alternatively, choose a specific language to make the AI respond only in that language.
Note: Auto-detection ensures dynamic responses based on the user's input, while selecting a specific language ensures consistency.
2. How to Manage Automatic Data Update?
The Automatic Data Update feature allows you to control how often YourGPT Chatbot updates your webpages for training.
Steps to Configure Automatic Data Update:
1. In Settings > General
2. Locate the Automatic Data Update section
3. Select your preferred update frequency from the dropdown:
Never: Disable automatic updates
Monthly: Update webpages once per month
4. Click Save to apply the changes
Tip: For dynamic content websites, choose regular update intervals. For static content, you can select "Never" and manually trigger updates when needed.
For detailed instructions on managing URLs, refer to the article: How to Change, Re-index, or Remove URLs.
3. Customize Attachment Responses

The Attachment Response feature lets you set an automatic reply for when users upload attachments during a chat.
Steps to Customize Attachment Responses:
In the Settings > General.
Navigate to the Attachment Response section.
Enter a custom message in the text field, such as:
"Thank you for sharing. We'll review it shortly."
"Attachment received! Our team will get back to you soon."
Click Save to apply the changes.
Note: A thoughtful response improves user experience and builds trust.
4. Conversation Settings
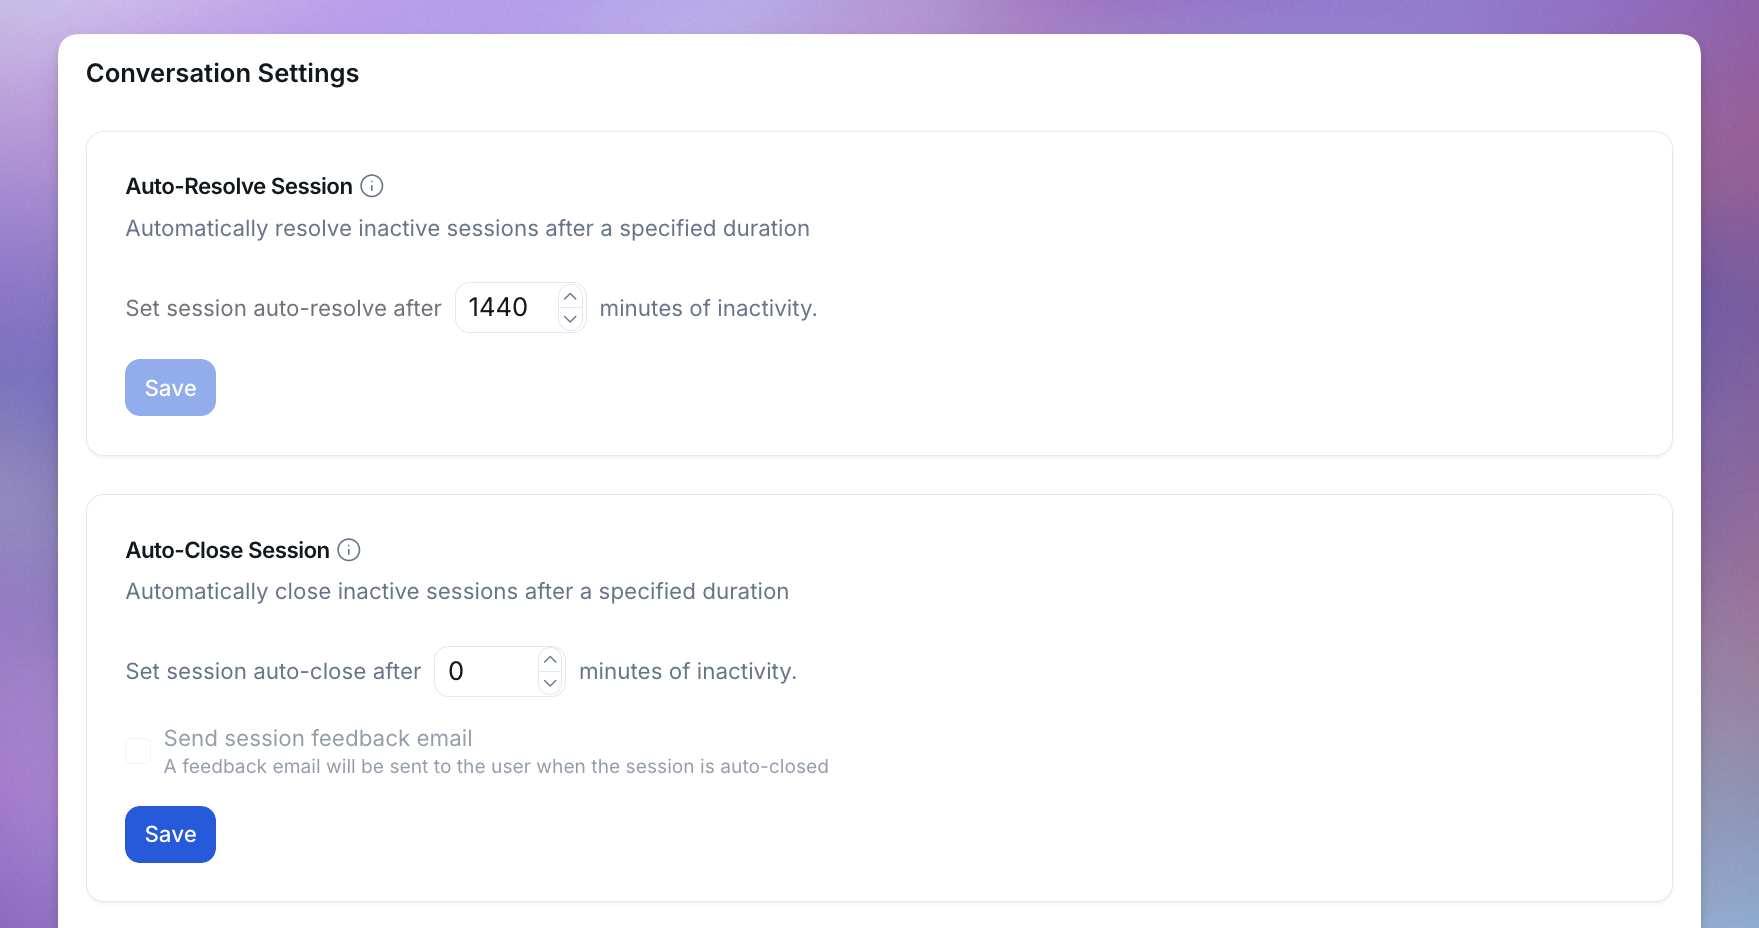
The Conversation Settings section helps you manage how sessions are handled based on user activity.
Auto-Resolve Session
Automatically resolve inactive sessions after a specified duration to keep your conversation dashboard organized.
Steps to Configure Auto-Resolve Session:
1. Go to Settings > General
2. Find the Auto-Resolve Session section under Conversation Settings
3. Enable the feature by toggling it on
4. Set the inactivity timeout duration (in minutes)
5. Click Save to confirm
Benefit: This automatically marks conversations as resolved after a period of inactivity, helping you focus on active queries.
Auto-Close Session
Automatically close inactive sessions after a specified duration to maintain clean session records.
Steps to Configure Auto-Close Session:
1. In Settings > General
2. Find the Auto-Close Session section under Conversation Settings
3. Enable the feature
4. Set the inactivity timeout duration (in minutes)
5. *(Optional)* Enable "Send transcript to email" if you want users to receive the chat summary when the session ends
6. Click Save to apply
Tip: This helps keep sessions clean and users informed—without manual follow-up. The email transcript feature ensures users have a record of their conversation.
5. How to Set Data Retention?

Data retention allows you to define how long visitor and session data are stored to comply with data policies.
Steps to Set Data Retention:
Go to Settings > General.
Locate the Data Retention section.
Select a retention period from the dropdown (e.g., 30 days, 45,60 days) or None for no retention.
Click Save to confirm.
6. How to Configure Queued Replies?
Queued Replies (Queue Response) help manage delayed chatbot responses through integrations, making conversations feel more natural and human-like by adding a delay before the AI responds.
Steps to implement Queue Replies:
Access the Chatbot Dashboard
Log in to the YourGPT Chatbot platform.Navigate to General Settings
Click on the Settings tab within the Chatbot Dashboard and scroll to bottom.Enable Queue Replies
select the integration from the Queue Replies setting to activate this feature.Set Wait Timeout
Enter the waitTimeout value in seconds. This determines how long the chatbot waits before responding to queued messages.Save Changes
Click the Save Changes button to apply your Queue Replies configuration.
Use Case: Adding a 2-3 second delay makes the bot feel more human and prevents overwhelming users with instant responses. You can set different delays for platforms like WhatsApp, Messenger, or web chat.
7. How to Set Mode?
The Mode setting allows you to configure how your AI operates.
Steps to Configure Mode:
1. In Settings > General
2. Locate the Mode section
3. Select your preferred mode:
Agent Mode – enables your AI agent to perform multi-step actions, understand and analyze images, and execute complex workflows autonomously.
Chat Mode – provides text-only conversational interactions focused purely on answering questions and providing information
4. Click Learn more for detailed information about each mode
5. Click Save to apply the changes
Note: The mode setting affects how your AI interacts with users and processes requests. Refer to the documentation for choosing the right mode for your use case.
7. How to Delete a Chatbot?
Deleting a chatbot is a permanent action and should be done with caution. Once deleted, all settings, conversations, and training data associated with the chatbot will be permanently removed.
Steps to Delete a Chatbot:
In Settings > General.
Scroll down to the Delete Chatbot section.
Click the Delete Chatbot button.
Confirm the action when prompted.
⚠️ Warning: This action cannot be undone.
Related Articles
How to invite Team Members to Your AI Agent?
Add teammates, assign roles, and collaborate from chatbot settings.
How to Install YourGPT with Google Tag Manager
Learn how to easily add the YourGPT widget to your website using Google Tag Manager.
How to Temporarily Disable AI Responses
Disable bot responses for maintenance, testing, or manual handling
How To enable Image Understanding for Your AI
AI agent to process images and answer on them
What is the Difference Between Chat Mode & Agent Mode?
A Practical Guide to choose between Chat Mode and Agent Mode in YourGPT
How to Add an AI Helpdesk to Your Website Widget With Optional Password Access
Embed an AI Helpdesk in Your Widget and Secure It in Minutes
Anywhere, Anytime Access to YourGPT Support Inbox
Instant Live Support from Your Phone with the YourGPT Mobile App