
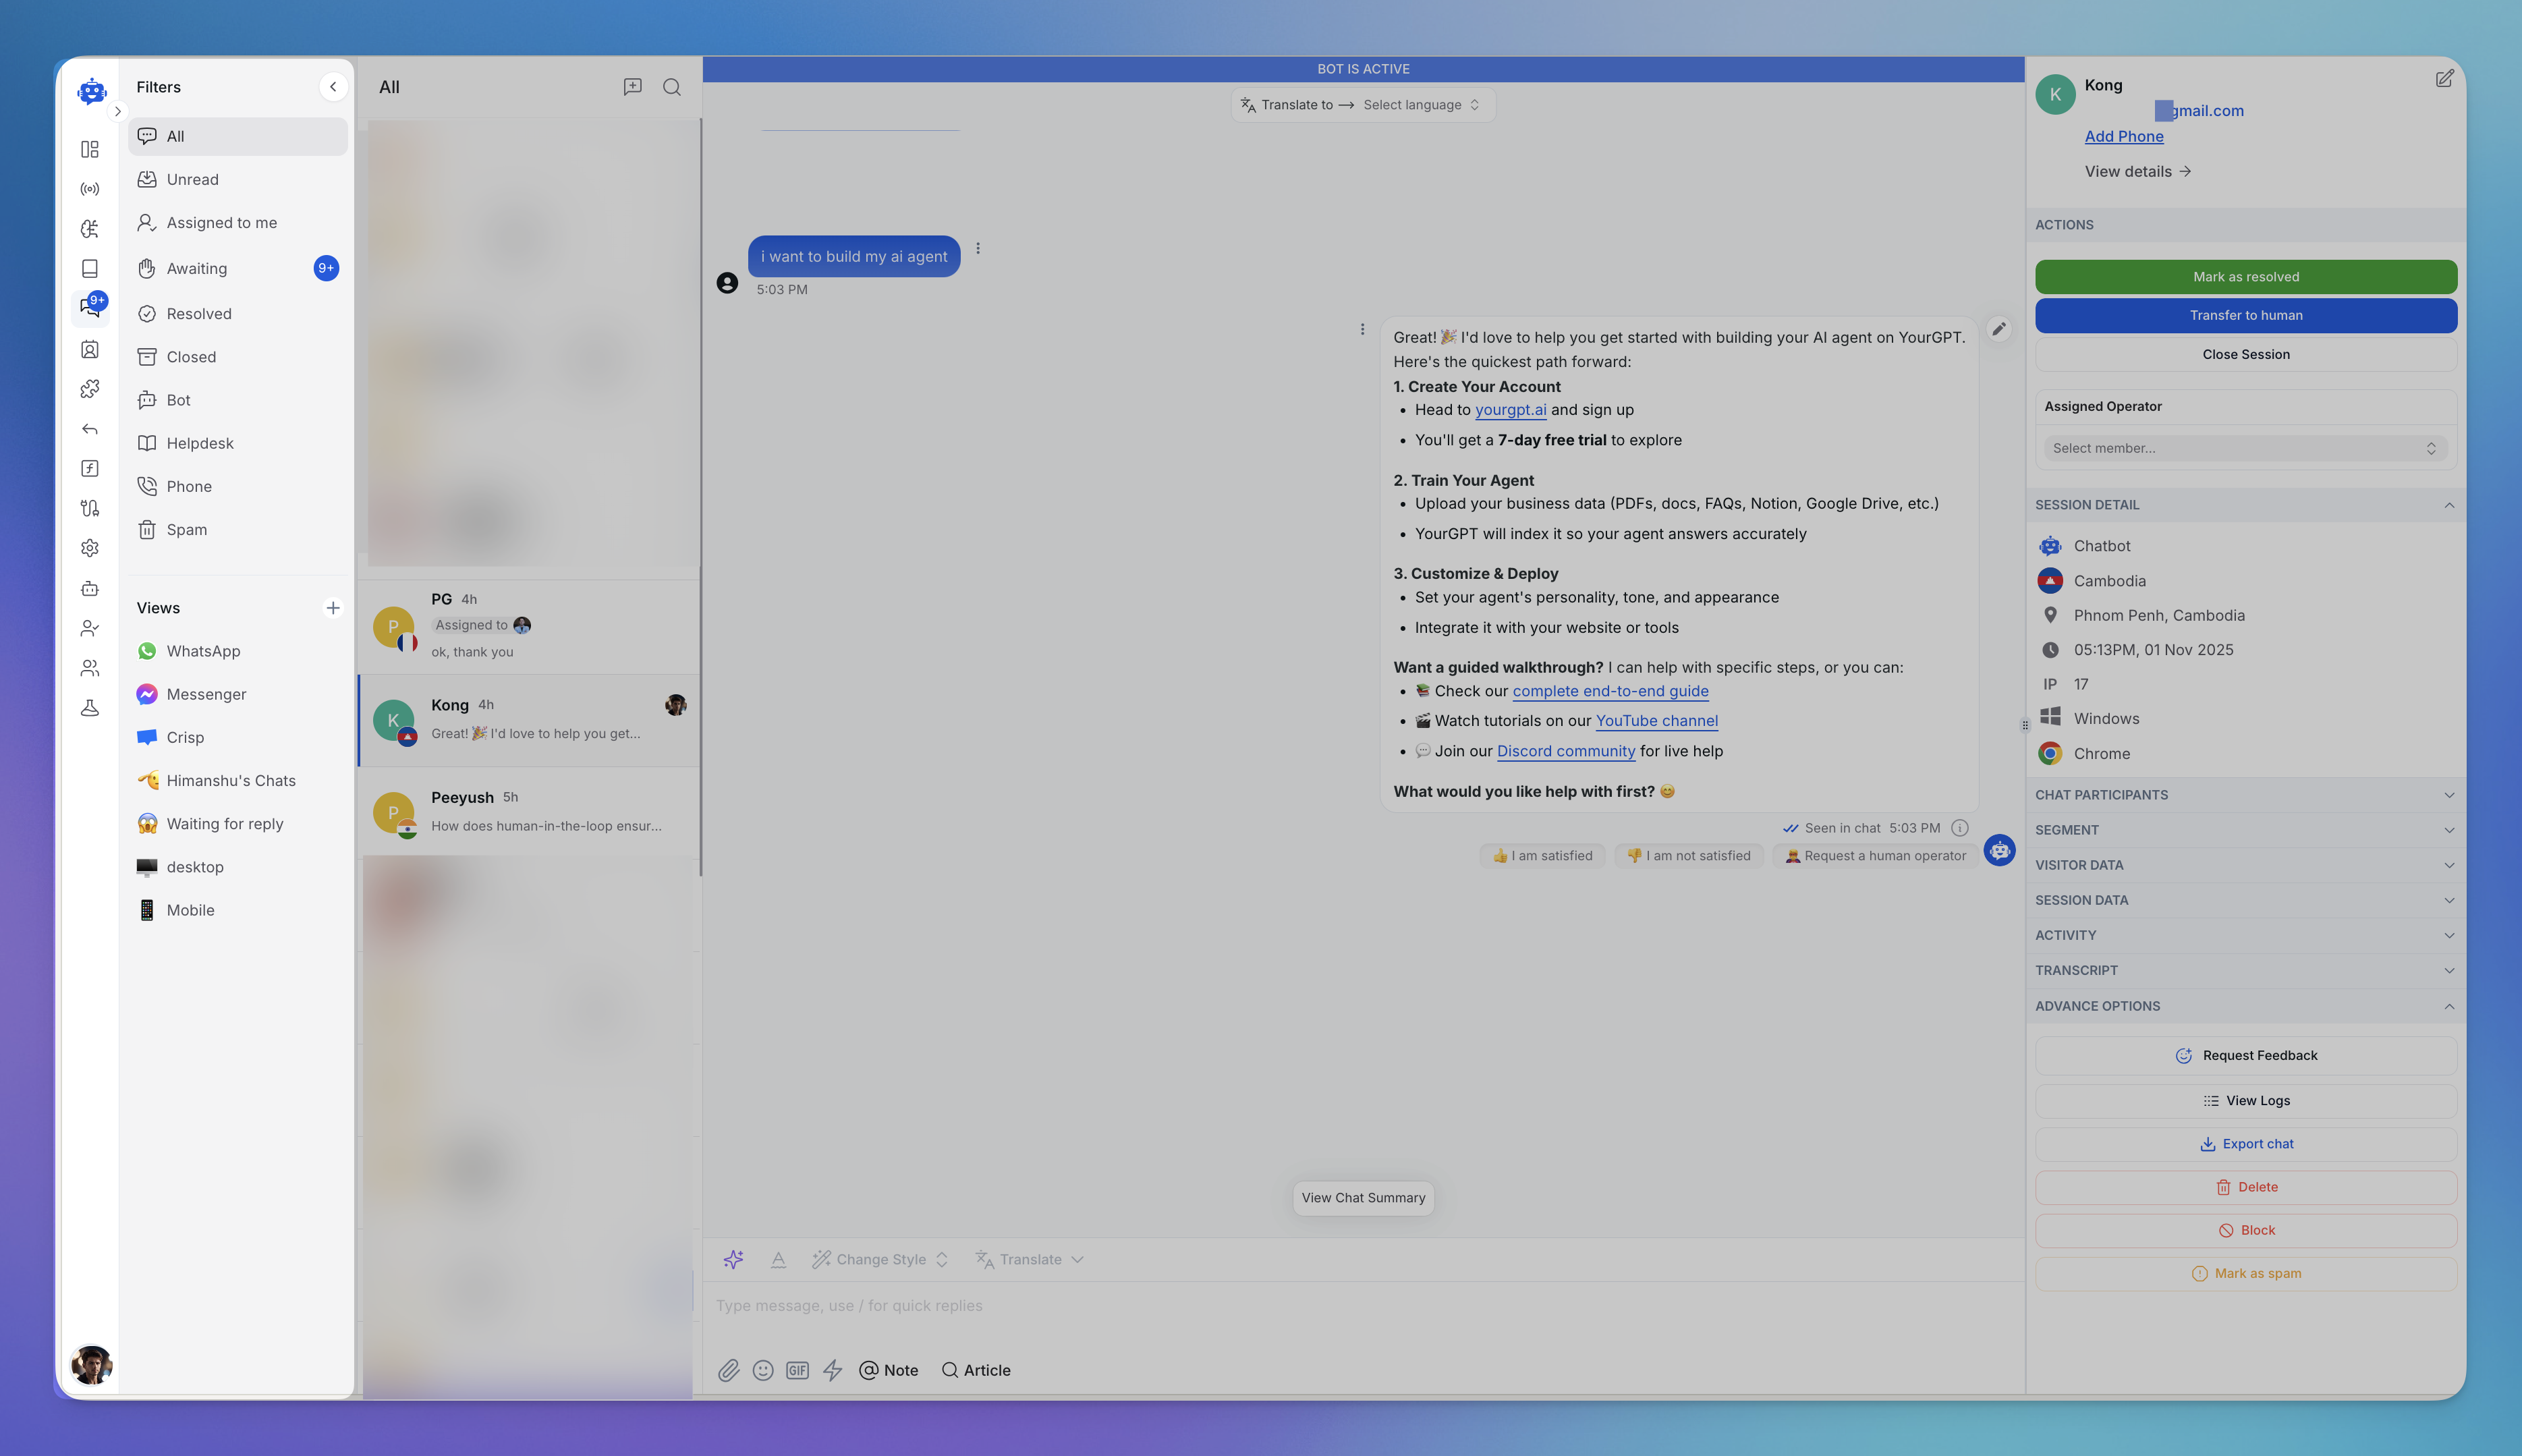
How to Manage Conversations in YourGPT Chatbot?
The Conversations tab in YourGPT Chatbot is your central hub for managing user interactions, including live chat support. It helps you resolve customer queries, manage live chat sessions, assign tasks to team members, and review session details. This guide helps you improve your workflow and manage interactions better.
Understanding the Conversations Interface
The Conversations tab is divided into three main sections:
1. Left Panel: Filters and Views for organizing conversations across all channels
2. Center Panel: Conversation list showing all active and past chats with visual indicators
3. Right Panel: Visitor Information Panel with detailed session data and comprehensive actions
How to use Chat Filter?
The Filters panel on the left side helps you organize and prioritize conversations efficiently. Here's what each filter does:
All – View every conversation across all channels and statuses
Unread – See messages that require immediate attention with unread indicators
Assigned to Me – Focus on conversations specifically allocated to you
Awaiting – Follow up on conversations waiting for user responses (shows count badge)
Resolved – Access completed conversations for reference or review
Closed – View conversations that have been closed and archived
Bot – View conversations automatically handled by your AI chatbot
Helpdesk – See queries resolved through AI-powered self-service solutions
Phone – Filter conversations that came through phone channels
Spam – Identify and manage conversations marked as spam
You can also build Custom views like Instagram, other channels provide platform-specific filtering or any custom for added precision, ensuring you can locate conversations based on your needs.
Conversation Details
The conversation list in the central panel helps you stay organized and on top of user queries. Here’s what you’ll see:
Visitor Names: Automatically generated or assigned for easy identification.
Timestamps: Track the last interaction to manage response times.
Assignment Tags: Know whether a bot or operator is handling the conversation.
Unread Indicators: A blue dot shows chats that need your attention.
You can also sort conversations by filters or views, such as Instagram, or other connected channels.
How to use Chat Window?
The chat window serves as the core space where all interactions between the user, AI, and operator are managed. It offers a clear and comprehensive view of conversations, empowering you to handle queries effectively. Here's how you can make the most of its features:
Conversation History: Access the entire chat thread, including user messages, AI-generated responses, and operator replies, all presented with clear timestamps for context.
Ask AI: Leverage AI to generate responses or suggestions, helping you streamline your workflow and respond faster.
Change Style: Modify the tone or style of your message to match the user’s expectations or the nature of the query.
Translate: Instantly translate messages to ensure smooth communication across different languages.
Media Options:
Share images for visual clarity.
Add a personal or engaging touch using GIFs or emojis.
Quick Replies: Use slash commands (/quick-reply) to quickly send predefined responses.
Type Message: Draft replies in the text input field for personalized and detailed communication.
Notes: Add internal notes to provide context for team collaboration or to support escalations for unresolved queries.
Article: Send help articles from your Helpdesk knowledge base content
Mark as Resolved: Close the chat thread once the issue is resolved to keep your workflow organized.
Transfer to Human: Escalate complex queries or unresolved issues from AI to a human operator for personalized attention.
Additionally, feedback tools, such as thumbs up/down, let users rate their experience, offering valuable insights into service quality and user satisfaction.
Additional Actions
- View Chat Summary: Button at the bottom to see conversation overview
- Message Options: Three-dot menu (⋮) for additional actions on messages (making correction, view source, copy message, delete).
- Edit: Pencil icon to edit the message
The chat window ensures seamless communication and collaboration among all participants—user, AI, and operator—enhancing the efficiency and overall experience of customer support.
How to use Visitor Information Panel?

The Visitor Information Panel on the right side provides comprehensive visitor data and quick actions for managing conversations effectively.
Visitor Profile Section
At the top of the panel:
Visitor Name: Display name with profile picture (e.g., "Kong")
Contact Information: Email address (e.g., "@mail.com")
Add Phone: Link to add phone number to visitor profile
View Details: Access complete visitor profile information
Primary Action Buttons
Three key action buttons for conversation management:
Mark as Resolved (Green button): Close the conversation when the issue is successfully resolved
Transfer to Human (Blue button): Escalate from AI to human operator for personalized support
Close Session (Gray button): End the current session completely
Assignment Management
You have the option to Assigned Operator
Dropdown with "Select member..." placeholder
Assign conversations to specific team members
Reassign chats for better workload distribution
View currently assigned operator
Session Details at a Glance
Source: Identify whether the query is AI-handled or user-initiated.
Location: See the visitor’s country and city for personalized interactions.
Session Time: Know exactly when the chat began with precise timestamps.
IP Address: Access the visitor’s IP for session tracking or troubleshooting.
Device Information: Understand what device, operating system, and browser the visitor is using for added context.
Expandable Information Sections
Click to expand any of these sections:
Session — View complete session details including:
Source — Identify whether the query is AI-handled or user-initiated
Location — See the visitor’s country and city for personalized interactions
Session Time — Know exactly when the chat began with precise timestamps
IP Address — Access the visitor’s IP for session tracking or troubleshooting
Device Information — Understand what device, operating system, and browser the visitor is using for added context
Chat Participants — View all participants involved in the conversation (operators, AI assistants, team members)
Segment — View visitor segmentation data, categorization, and user groups
Visitor Data — See additional visitor information, custom data fields, and user attributes
Session Data — View detailed session metrics, interaction data, and engagement statistics
Activity — Track visitor behavior page views, and engagement history
Advanced Tools
Expand ADVANCE OPTIONS to access:
Feedback and Support
Request Feedback — Proactively ask users for feedback
Session Management
View Logs — Review complete interaction history and troubleshooting data
Export Chat — Download the full conversation transcript
Moderation Actions
Delete — Permanently remove the conversation
Block — Block the visitor from starting future conversations
Mark as Spam — Flag the conversation as spam
This panel ensures that operators have all the relevant information and actions at their fingertips, enabling seamless, efficient, and personalized support.
Related Articles
How to invite Team Members to Your AI Agent?
Add teammates, assign roles, and collaborate from chatbot settings.
How to Install YourGPT with Google Tag Manager
Learn how to easily add the YourGPT widget to your website using Google Tag Manager.
How to Temporarily Disable AI Responses
Disable bot responses for maintenance, testing, or manual handling
How To enable Image Understanding for Your AI
AI agent to process images and answer on them
What is the Difference Between Chat Mode & Agent Mode?
A Practical Guide to choose between Chat Mode and Agent Mode in YourGPT
How to Add an AI Helpdesk to Your Website Widget With Optional Password Access
Embed an AI Helpdesk in Your Widget and Secure It in Minutes
Anywhere, Anytime Access to YourGPT Support Inbox
Instant Live Support from Your Phone with the YourGPT Mobile App